User Controls and Display
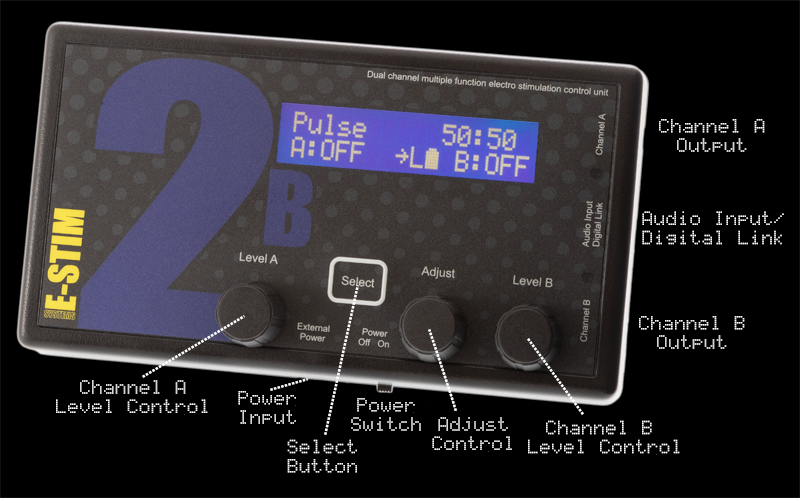
The 2B unit has five user controls. Each control allows the user to adjust a particular aspect of the output. It is the operation of the controls in combination that will allow the user to provide an effective electro-stimulation session.

The controls are (from left to right)
Channel A Level Control
The Select Button
The Adjust Control
Channel B Level Control
There is also a power slide switch (on the bottom side of the unit) and an LCD contrast control (accessed from the rear of the unit.)
Channel Level Controls
The channel level controls adjust the absolute level of the output of the relevant channel. Each Channel control value is displayed on the LCD screen, with values from OFF (0) to MAX (100%). OFF is zero output, MAX is full output. The output levels automatically drop to OFF when selecting a mode, and will always start off at OFF (0%) when selecting a new mode.
 Select Button
The select button is used in conjunction with the Adjust control, to change and adjust the settings in all the various modes, including changing and selecting the modes themselves. The Select Button responds to a light double press, there is no need to press too hard. Pressing and holding the Select Button while rotating the Adjust Control allows further adjustments of the Feel in many modes.
Adjust Control
The adjust control is used in conjunction with the select button, to change and adjust the settings in all the various modes, including changing the modes themselves.
Depending on the mode, the 'C' and 'D' values can be adjusted using the Adjustment Control. Turning the Adjustment Control either clockwise or anticlockwise will change the 'C' adjustment value up or down, while pressing and holding the select button and turning the Adjustment Control which change the value of the 'D' setting. Not all modes use both the C and D values.
Displays
The 2B has 3 display elements, the bright backlight LCD display, giving the user details of all of the functions of the 2B, from control settings to helpful messages.
The two blue LEDs on the right hand side of the unit illuminate in proportion to the intensity of the relevant output. The LEDs might appear to glow slightly when the unit is turned on and there is no output - this is due to the internal reflection of the backlight and is not a fault.

The LCD display depends on the mode but the basics are:-
Top Line
showing the Mode, (the current program mode) and Adjust Values (Dependant on the Mode, the first value is altered by the Adjust Control Knob and the second value by Select + Adjust Control Knob)
Bottom Line
Showing the Level of Channel A, Join Control Status, Commander Status, Power Mode, Battery Level and the current Level of Channel B. The Arrow present on the bottom line indicates the Commander digital link is available.
Power Level Display
The Power Level Display shows the current power level the 2B is set to. Options are L - Low, and H for High. For more details on the power level selection system see Power Selection


Battery Level Display
The battery level is shown on most displays. because of the differing loads present when stimming the battery symbol may flicker and drop at times, this is perfectly normal. The 2B is also designed to use as much of the battery capacity possible, so as play goes on you may find you need to increase the output levels to compensate for this drop.
Full battery

Battery in use, but not depleted.

Battery nearly empty.

Adjusting Contrast
To change the contrast of the LCD, turn the unit over, and with a small insulated cross head screwdriver insert into the hole in the rear of the unit and gently adjust the cross head adjustment inside. Adjustments should not be necessary as the contrast is set during testing in the workshops, but may change over time depending on environmental conditions.
<picture to follow>


