2.106 Manual
Welcome to the 2B
Congratulations on purchasing an E-Stim Systems Series 2B™. Given sufficient care your 2B™ unit should give you many years of erotic electro-stimulated pleasure. Before starting always read the instructions and ensure you are completely familiar with all of the controls and the safety warnings prior to use.
We have tried to make the control system simple and easy to use, without compromising on the features available. You should find something for everyone, and if you don’t then let us know.
Key Features
|
|
Power and Control
As well as offering all the interesting modes like Pulse, Tickle and Squeeze, the 2B will run in three different power levels. ‘L’ (for LOW power) is the default setting and is ideal for those people who are just starting out on their E-Stim experience, whilst the ‘H’ high power setting takes the 2B unit into a whole new realm of serious power output. Follow the link for more details on the power system.
The 2B can also be operated from the mains via an optional DC/Mains adaptor. This is a high quality switched mode device that is designed to provide the 2B with exactly what it needs in terms of power. We recommend you DO NOT attempt to use other power supplies, as they are not designed for this unit. Doing so may invalidate your guarantee.
|
SAFETY WARNING (DO NOT CONNECT THE E-Stim Systems 2B UNIT OR ANY ELECTRICAL DEVICE TO ANY LOCATION ABOVE THE WAIST (ACROSS THE ARMS COUNTS AS ABOVE THE WAIST!), BUT ESPECIALLY DO NOT CONNECT ACROSS THE HEART, CHEST, NECK OR HEAD. DO NOT USE IF FITTED WITH A PACEMAKER OR ARE PREGNANT. REMEMBER YOU USE THIS DEVICE AT YOUR OWN RISK. YOU MUST READ AND UNDERSTAND THE USER MANUAL AND ALL OTHER INSTRUCTIONS BEFORE ATTEMPTING OPERATION. |
E-Stim Basics
What is E-Stim
E-Stim is simply using electricity to stimulate parts of the body. Using a dedicated E-Stim unit, rather than a TENS or home build device ensures you can play safely and gives you a much wide range of sensations to enjoy.
What do you need?
In order for E-Stim to work you need, a power unit, an electrode and a cable to connect the two together. The power box generates the signals that create the sensation. The electrode connects that sensation into or onto the body, depending on what the electrode is. Electrodes can be used on the surface of the skin, or inserted into the lower orifices.
E-Stim requires two points of contact. The current and thus the sensation flows between these two points and you then feel the sensation.
Keep Safe - Play below the waist
Generally we say play below the waist until you understand the issues and risks involved with play above the waist. Remember crossing current from hand to hand can run across the chest and is thus something we would not recommend you do.
Power and Waveforms
Its not all about Power
Power seems to be a major target for many people when purchasing an e-stim unit, but without the understanding of how power relates to play it is difficult to ensure you get the most out of any unit. Units that quote a straight power output such as 80mA are generally TENS based units that give no indication how the generated waveform actually provides the sensation of power delivery. Like a racing car, power is not just down to horse power but is related to how it is delivered.
The 2B is considered to be a powerful unit, but if you want even more power, then consider the optional power supply, which will give you around 30% more than battery alone.
Modes for Variety
The 2B has number program modes designed for pleasure and stronger sensations. Don't be surprised if the modes don't give you want you straight away. Nothing ever works for everyone everytime, at least on the default settings, so experiment. Because of the way we have designed the wave forms, not every mode will provide you with sensation at the same point, nor will every mode give you the sensation that someone else feels, even with the same settings. E-Stim is a complex subject almost like an art form for many, and it can take practice to find our what you enjoy. Enjoy the journey.
Waveforms created for Sensation
E-Stim interacts with the nervous system of the body in order to provide a sensation. This means that the nature of the waveform is crucial, providing maximum sensation to the nerves, but with a reduced amount of energy that can cause heating and damage to underlying tissues. All E-Stim Systems devices utilise AC based wave forms so there is no issues with DC causing tissue damage, and the waveforms are developed to maximise the sensation as effectively as possible.
Feel
Virtually all of our modes have some control over feel. Feel adjusts portions of the waveform to give to a difference in feel, from soft and spiky at one end, to harsh and hard at the other. The choice is down to you, but it gives you more of a range of sensations than normally possible.
Power Control
Power delivery depends on the unit itself, the power source (using a 2B with a power supply with give an increased sensation of power), the Levels set, the settings of the adjustments, the current mode, Box level, output level, electrodes used and electrode positioning. All of these elements combine to give you a wide range of sensation from a tickle up to and beyond a hard throbbing pulse.
Power Levels
The 2B operates in 2 main power settings, with each level having a 0-100% setting. Low Power, is the default, High Power exists for more experienced players.
QuickStart
The 2B unit is an advanced multiple program E-Stim unit designed to be used by beginners and advanced users alike. It has advanced safety features as well as an extensive control system and easy to use controls. We strongly recommend you read the manual from cover to cover, but we have a quick start guide to help you with your first explorations.
Once you have fitted the battery find the on-off slide switch and turn the unit on. Make sure you have nothing else attached to the unit.
The LCD should light up, and text appears.

then the current firmware version will be displayed

If the LCD illuminates, but no text appears then you many need to adjust the contrast. Once your 2B has started up you should see a display similar to

Starting to Play
Step 1
Read this manual and familiarise yourself with the controls.
Step 2
Step 3
Turn the 2B on. (The power slide switch can be found on the bottom of the control unit). The display should light up and the 2B will go through its self test, as well as displaying the firmware version

and then

a couple of seconds later you should see should now see a screen like this.

Now turn the 2B off. If for some reason you see a different display, then you can perform a Factory Reset to get everything back to the default state.
Step 4
Choose electrodes. The 2B is supplied with a simple set of Sticky pad electrodes and 2mm cables to get you started, but we do offer an ever increasing range of E-Stim Electrodes and accessories. See https://www.e-stim.co.uk and https://www.e-stimsystems.com for more details.
Step 5
Connect things up. Always ensure the 2B is switched off when connecting or disconnecting electrodes.
Step 6 and 7 and 8 .......
Turn the 2B back on
Now you can start experimenting with the modes
How to Fit the Battery
Battery Display
The battery level is shown on most displays. because of the differing loads present when stimming the battery symbol may flicker and drop at times, this is perfectly normal. The 2B is also designed to use as much of the battery capacity possible, so as play goes on you may find you need to increase the output levels to compensate for this drop.
Full battery

Battery in use, but not depleted.

Battery nearly empty.

Changing the Battery
The 2B is powered by a single 9V PP3 alkaline battery, or a mains power supply. Unlike some other units it is also possible to use rechargeable batteries in the 2B control unit with varying levels of success. We do NOT recommend the use of Zinc Carbon batteries with your 2B control unit.
- Ensure the unit is switched off, and any electrodes are disconnected.
- Turn the unit over and using a small screwdriver or a fingernail inserted into the battery compartment slot, gently prise the battery compartment cover out.
Remove the old battery (if fitted) and replace with a fresh Alkaline PP3. The battery connector is polarised so it should not be possible to connect the battery incorrectly, but ensure the polarity is correct before attempting connection.
- Place the battery into the unit and replace the battery compartment cover. The cover is fitted with two tabs which insert into the lower half of the case first, and then the top half of the cover will clip into position.
- Turn the unit over. The unit is now ready for operation.
- Please note we do NOT recommend the use of zinc carbon batteries due to their general poor performance.
In the event the 2B unit is not being used for a period of time, remove the battery to avoid any potential damage from battery leakage.
External Power
It is possible to use an external power supply with the 2B, but because of the isolation and safety issues when connecting to the mains we strongly recommend you only use an E-Stim Systems supplied universal power supply. The plug socket is beside the on off switch.
Always ensure that when you connect the external power unit, the 2B is switched off.
Insert the plug into the socket, switch the mains power on, then switch the 2B on. The display should light up as if batteries were fitted, but the display will be slightly different with a smaller symbol showing.

Use of the power supply will offer around a 30% Power increase. We suggest you remove the internal battery if you are using an external power supply.
User Controls and Display
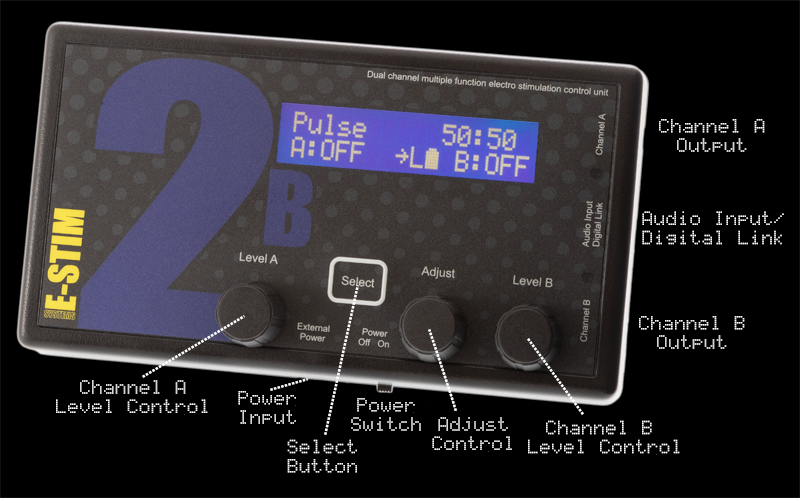
The 2B unit has five user controls. Each control allows the user to adjust a particular aspect of the output. It is the operation of the controls in combination that will allow the user to provide an effective electro-stimulation session.

The controls are (from left to right)
Channel A Level Control
The Select Button
The Adjust Control
Channel B Level Control
There is also a power slide switch (on the bottom side of the unit) and an LCD contrast control (accessed from the rear of the unit.)
Channel Level Controls
The channel level controls adjust the absolute level of the output of the relevant channel. Each Channel control value is displayed on the LCD screen, with values from OFF (0) to MAX (100%). OFF is zero output, MAX is full output. The output levels automatically drop to OFF when selecting a mode, and will always start off at OFF (0%) when selecting a new mode.
 Select Button
The select button is used in conjunction with the Adjust control, to change and adjust the settings in all the various modes, including changing and selecting the modes themselves. The Select Button responds to a light double press, there is no need to press too hard. Pressing and holding the Select Button while rotating the Adjust Control allows further adjustments of the Feel in many modes.
Adjust Control
The adjust control is used in conjunction with the select button, to change and adjust the settings in all the various modes, including changing the modes themselves.
Depending on the mode, the 'C' and 'D' values can be adjusted using the Adjustment Control. Turning the Adjustment Control either clockwise or anticlockwise will change the 'C' adjustment value up or down, while pressing and holding the select button and turning the Adjustment Control which change the value of the 'D' setting. Not all modes use both the C and D values.
Displays
The 2B has 3 display elements, the bright backlight LCD display, giving the user details of all of the functions of the 2B, from control settings to helpful messages.
The two blue LEDs on the right hand side of the unit illuminate in proportion to the intensity of the relevant output. The LEDs might appear to glow slightly when the unit is turned on and there is no output - this is due to the internal reflection of the backlight and is not a fault.

The LCD display depends on the mode but the basics are:-
Top Line
showing the Mode, (the current program mode) and Adjust Values (Dependant on the Mode, the first value is altered by the Adjust Control Knob and the second value by Select + Adjust Control Knob)
Bottom Line
Showing the Level of Channel A, Join Control Status, Commander Status, Power Mode, Battery Level and the current Level of Channel B. The Arrow present on the bottom line indicates the Commander digital link is available.
Power Level Display
The Power Level Display shows the current power level the 2B is set to. Options are L - Low, and H for High. For more details on the power level selection system see Power Selection


Battery Level Display
The battery level is shown on most displays. because of the differing loads present when stimming the battery symbol may flicker and drop at times, this is perfectly normal. The 2B is also designed to use as much of the battery capacity possible, so as play goes on you may find you need to increase the output levels to compensate for this drop.
Full battery

Battery in use, but not depleted.

Battery nearly empty.

Adjusting Contrast
To change the contrast of the LCD, turn the unit over, and with a small insulated cross head screwdriver insert into the hole in the rear of the unit and gently adjust the cross head adjustment inside. Adjustments should not be necessary as the contrast is set during testing in the workshops, but may change over time depending on environmental conditions.
<picture to follow>
Inputs and Outputs
Outputs
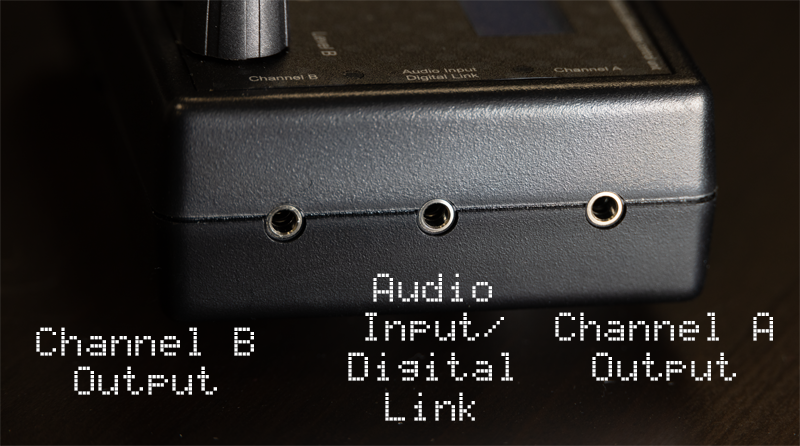
Connection to any electrode is via two heavy duty 3.5mm mono jack sockets. Ensure the 2B is switched off before inserting or removing the connector to eliminate the possibility of either inadvertent electric shocks or short circuits occurring. When removing the connectors. Grip the insulated shaft of the connector, not the wire and gently pull.
Connections to your E-Stim 2B use industry standard 3.5mm mono jack plugs, compatible with a number of other manufacturers control units and electrodes.

Inputs
Connection to audio devices and the digital link system is via the centre 3.5mm stereo jack socket. Ensure the 2B is switched off before inserting or removing the connector to eliminate the possibility of short circuits occurring. When removing the connectors. Grip the shaft of the connector, not the wire and gently pull.
Ensure that audio devices or the digital link are only connected to the centre jack socket. Connecting to either of the output jack sockets will destroy your audio unit. The audio input is designed to operate with low level headphone style outputs. It is not possible to operate the Digital Link at the same time as the Audio Input. The Digital link cable despite appearances is NOT a standard USB cable. DO NOT attempt to attach any other USB cable to the 2B digital link input, you will destroy your 2B and invalidate your guarantee.
DO NOT attempt to connect an output to an input. It will destroy your 2B unit, and possibly the item you connect to.
Program Modes - Pulse Mode
In Pulse Mode both of the outputs pulse on and off together with equal on and off times. The Adjustment Control allows the user to adjust the pulse rate (how quickly they pulse on and off) and is adjustable from 1 (slow) to 99 (fast). Higher numbers indicate a faster repetition rate. The second value on the display, is the pulse feel, allowing you to adjust the sensation of each individual pulse, from soft to spiky, with values from 1 to 99. The amount of time the pulse is on is equal to the amount of time off.
Selecting Pulse Mode
To select the Pulse Mode, press the Select Button twice and rotate the Adjust Control to select the mode

Now press the Select Button to choose the currently displayed mode.

The screen shows the mode on the top line, then the Pulse Speed and Pulse Feel (50:50), on the bottom line the Channel A Level, Output Power Setting, Battery Level and Channel B Level.
Changing Values
To change the Pulse rate rotate the Adjust Control. You should see the first number on the top right of the screen change. Lower values indicate slower pulses. To change the Pulse Feel press and hold the Select Button while rotating the Adjust Control and you should see the second value on the top right of the screen change. Output levels are control by the Channel Level controls.
Pulse Range
The Pulse Rate is from around 1 second to 0.02 seconds.


