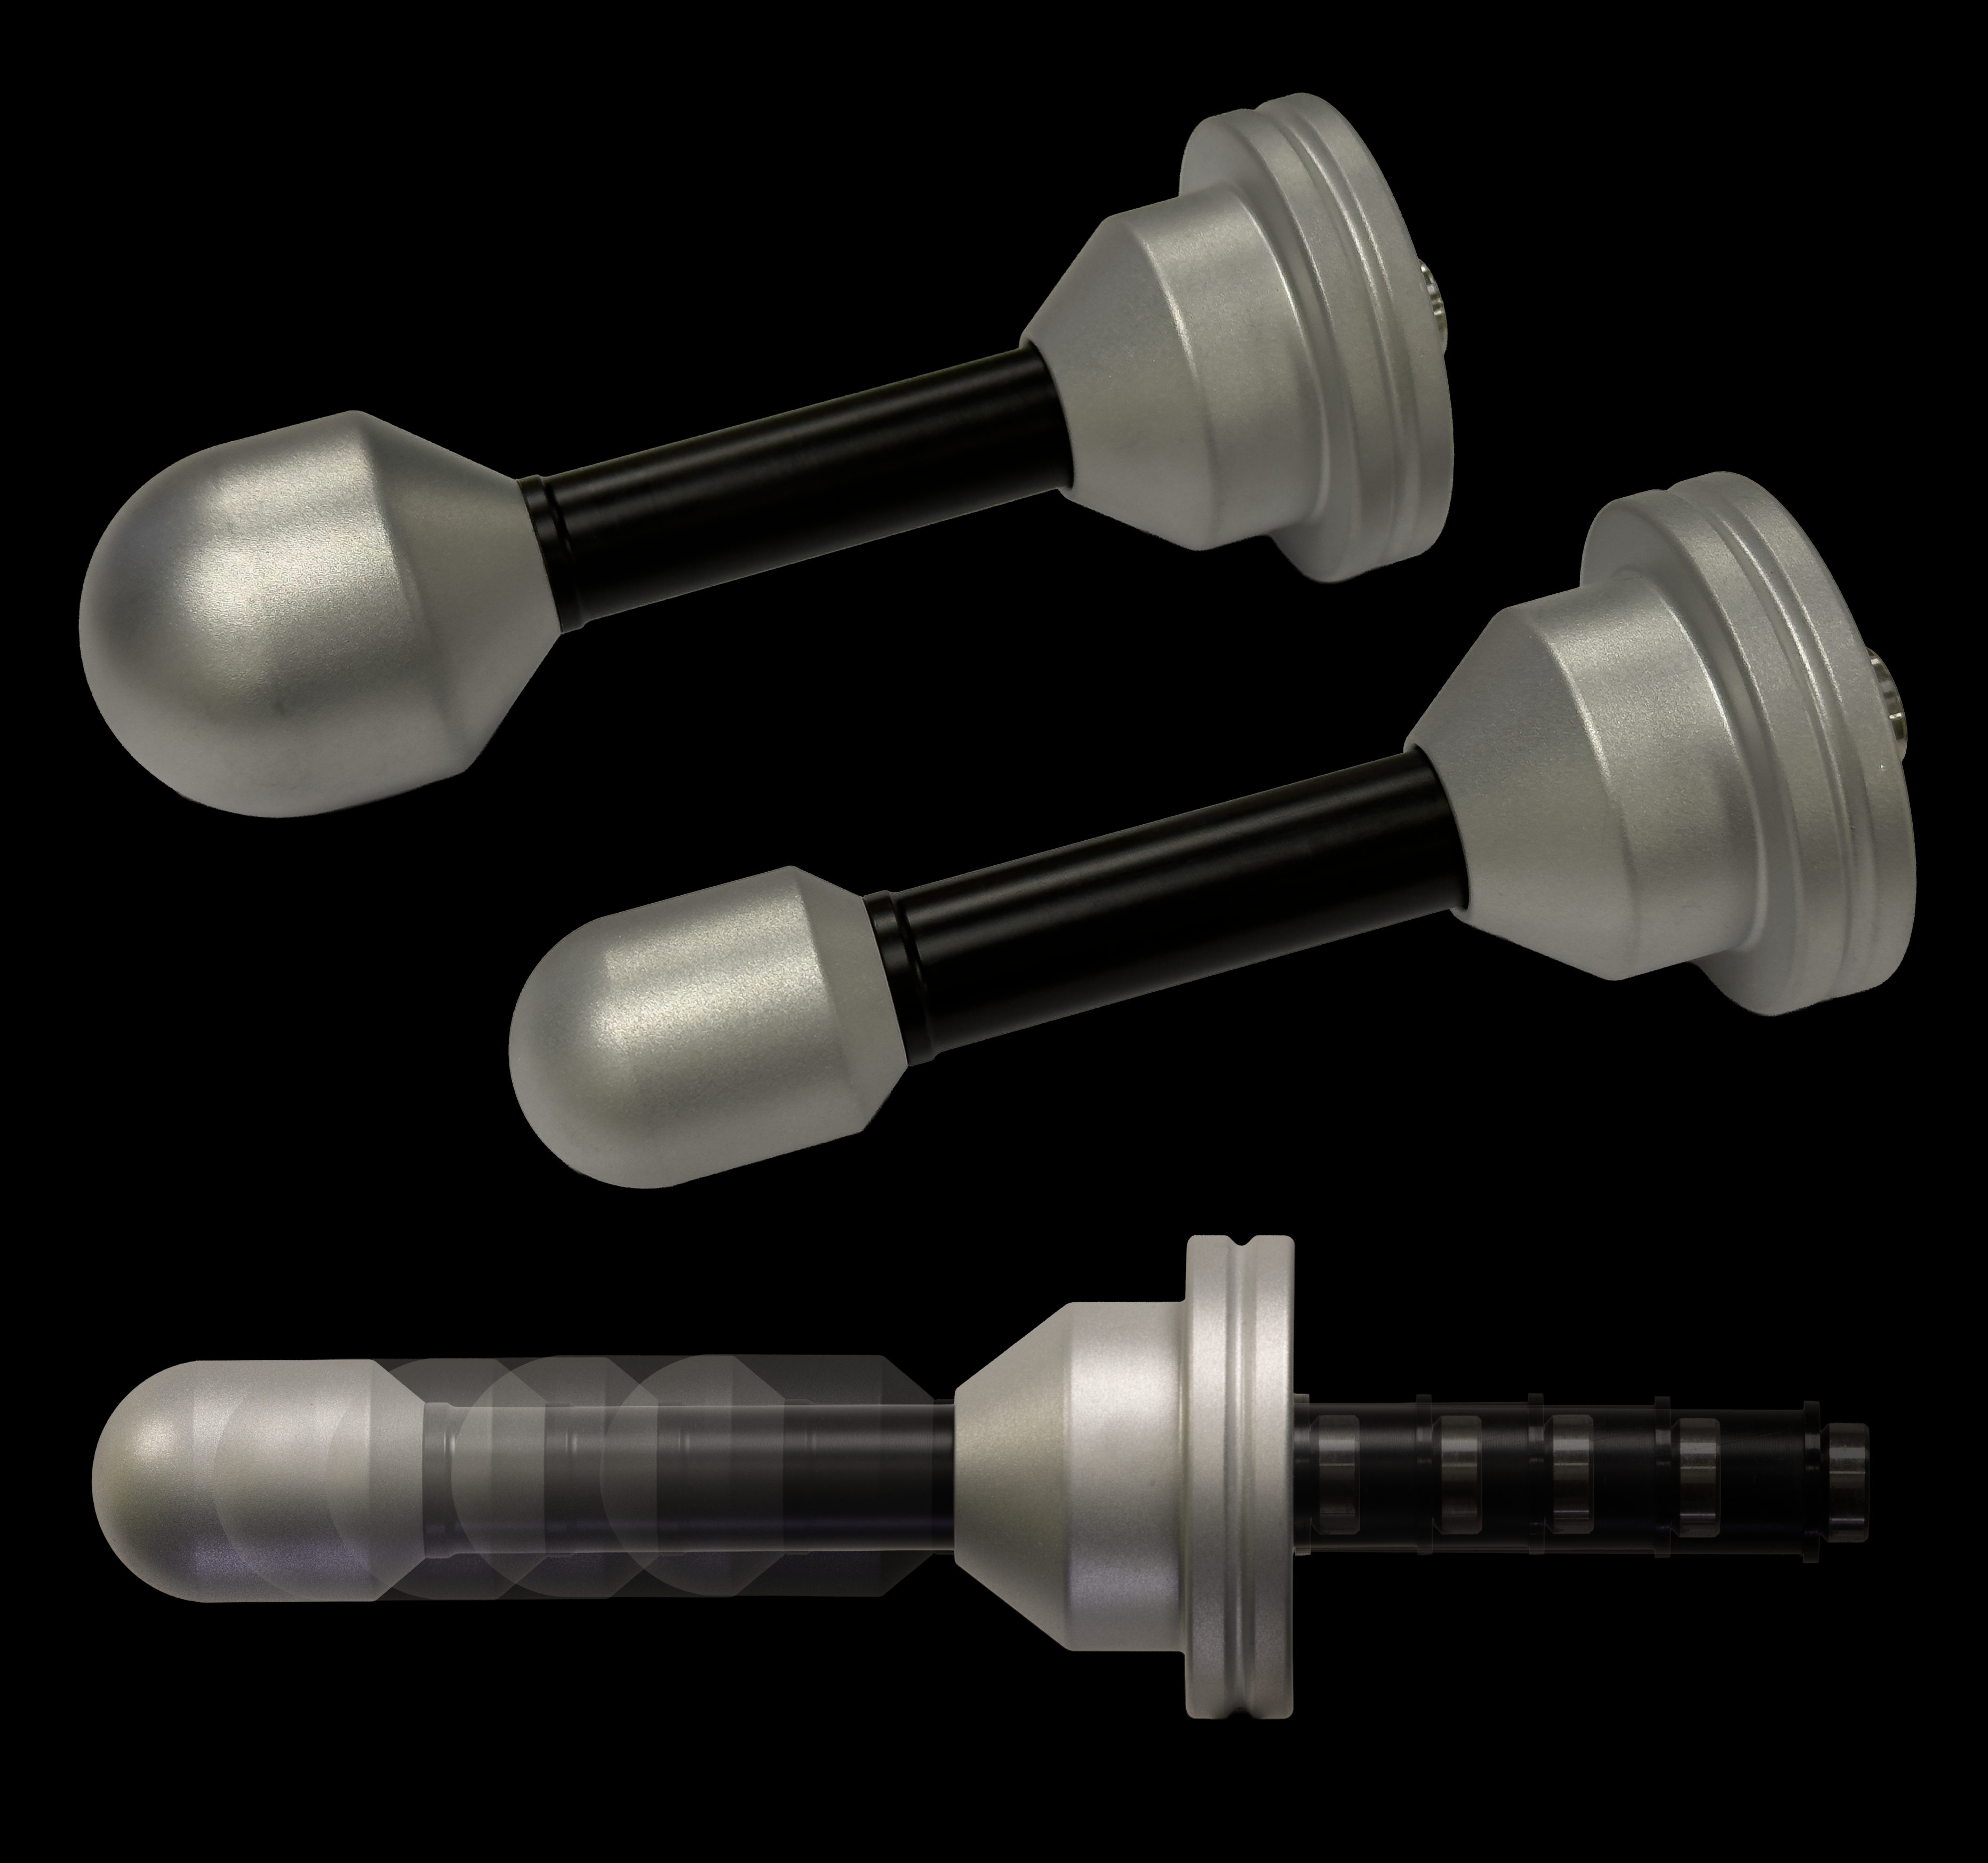
The Slider is the worlds adjustable sliding neck bipolar insertable electrode . Two head sizes are available: the Small Slider, based on the original Flange electrode, and the Large Slider, based on our world-famous Moaner. Both are CNC-machined in our Watford workshops, fully disassemblable, and of course, like all of our insertable electrodes they are both covered by our Lifetime Guarantee.
This instruction manual covers both sizes. They share the same neck mechanism, the same locking system, and the same care requirements. Where the two differ, it's noted.
You can buy the Slider on estim.store, and through all good E-Stim Systems stockists.
What do I get ?
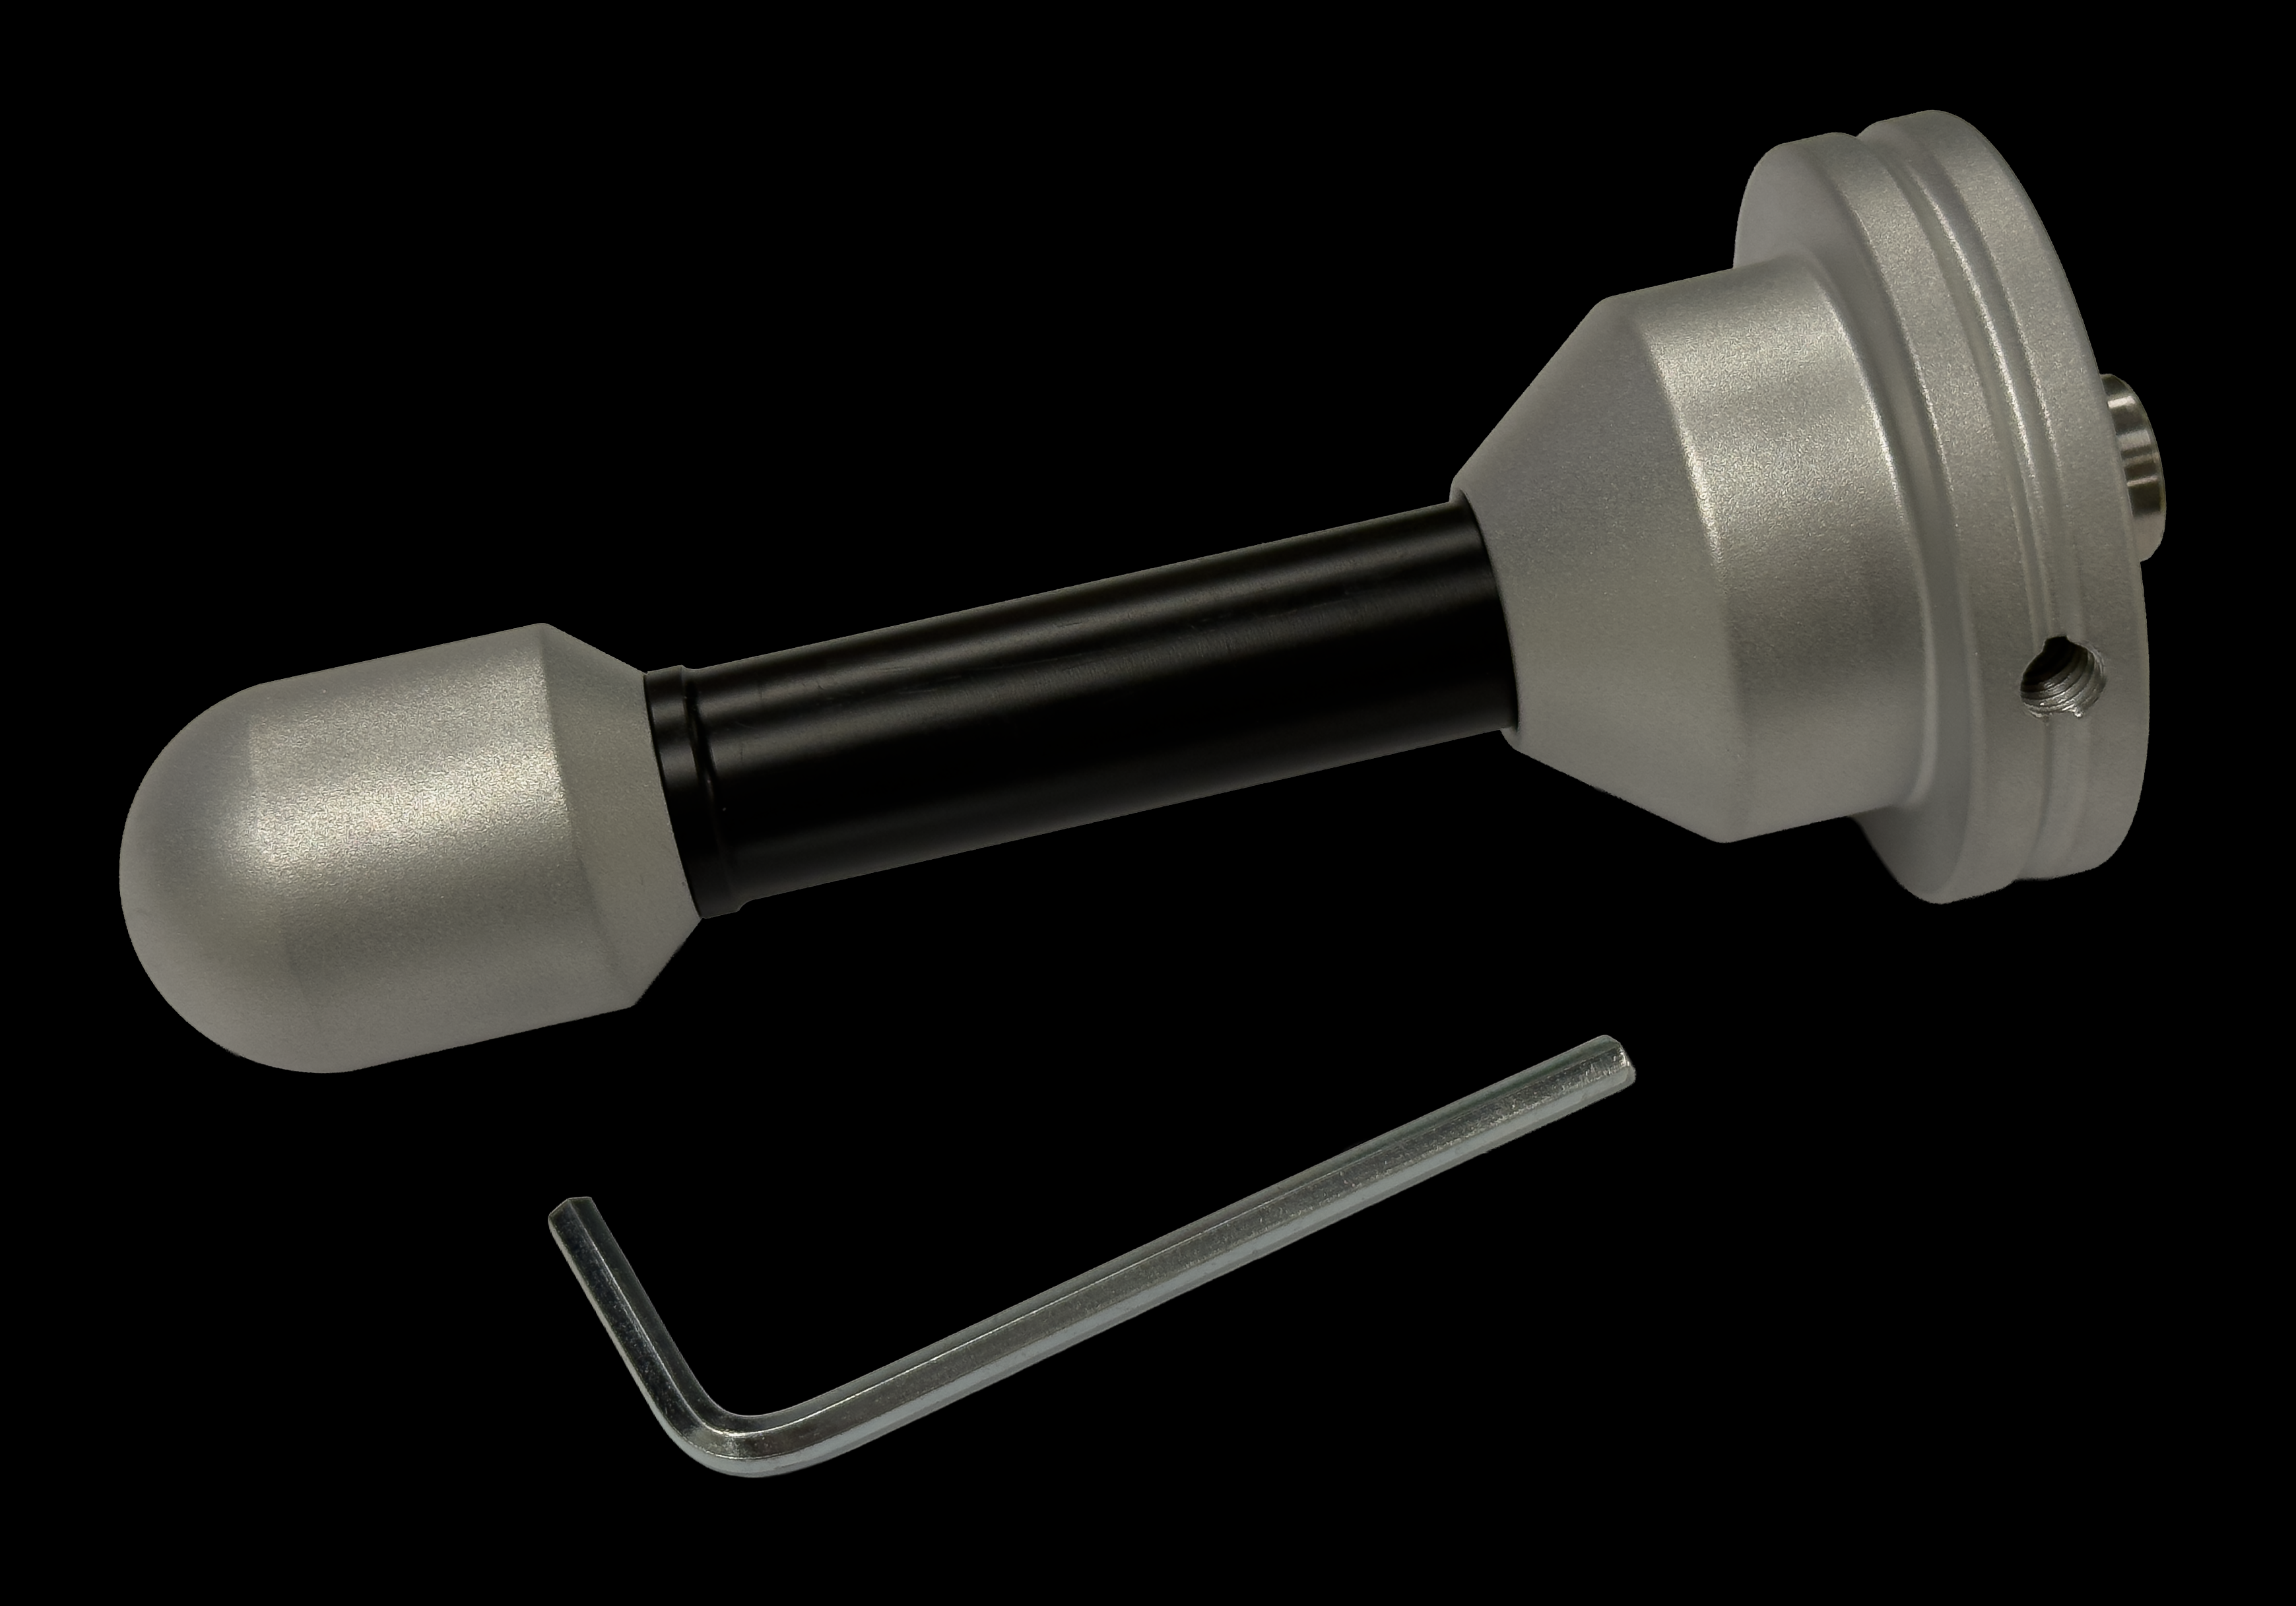
- 1 x Slider (Small or Large), with two 4mm sockets in the base
- 1 x Standard neck. 55mm max spacing, fitted to the Slider as standard
- 1 x 3mm hex key for locking the neck
- 1 x instruction card (with a QR code that brought you to this page)
If you've bought additional necks separately (Long 75mm, Short 35mm), they ship as three parts in their own packaging: the neck itself, a central bolt sized to that neck, and a base washer. Long and Short are also available together as a 2-pack.
 Connecting the Slider
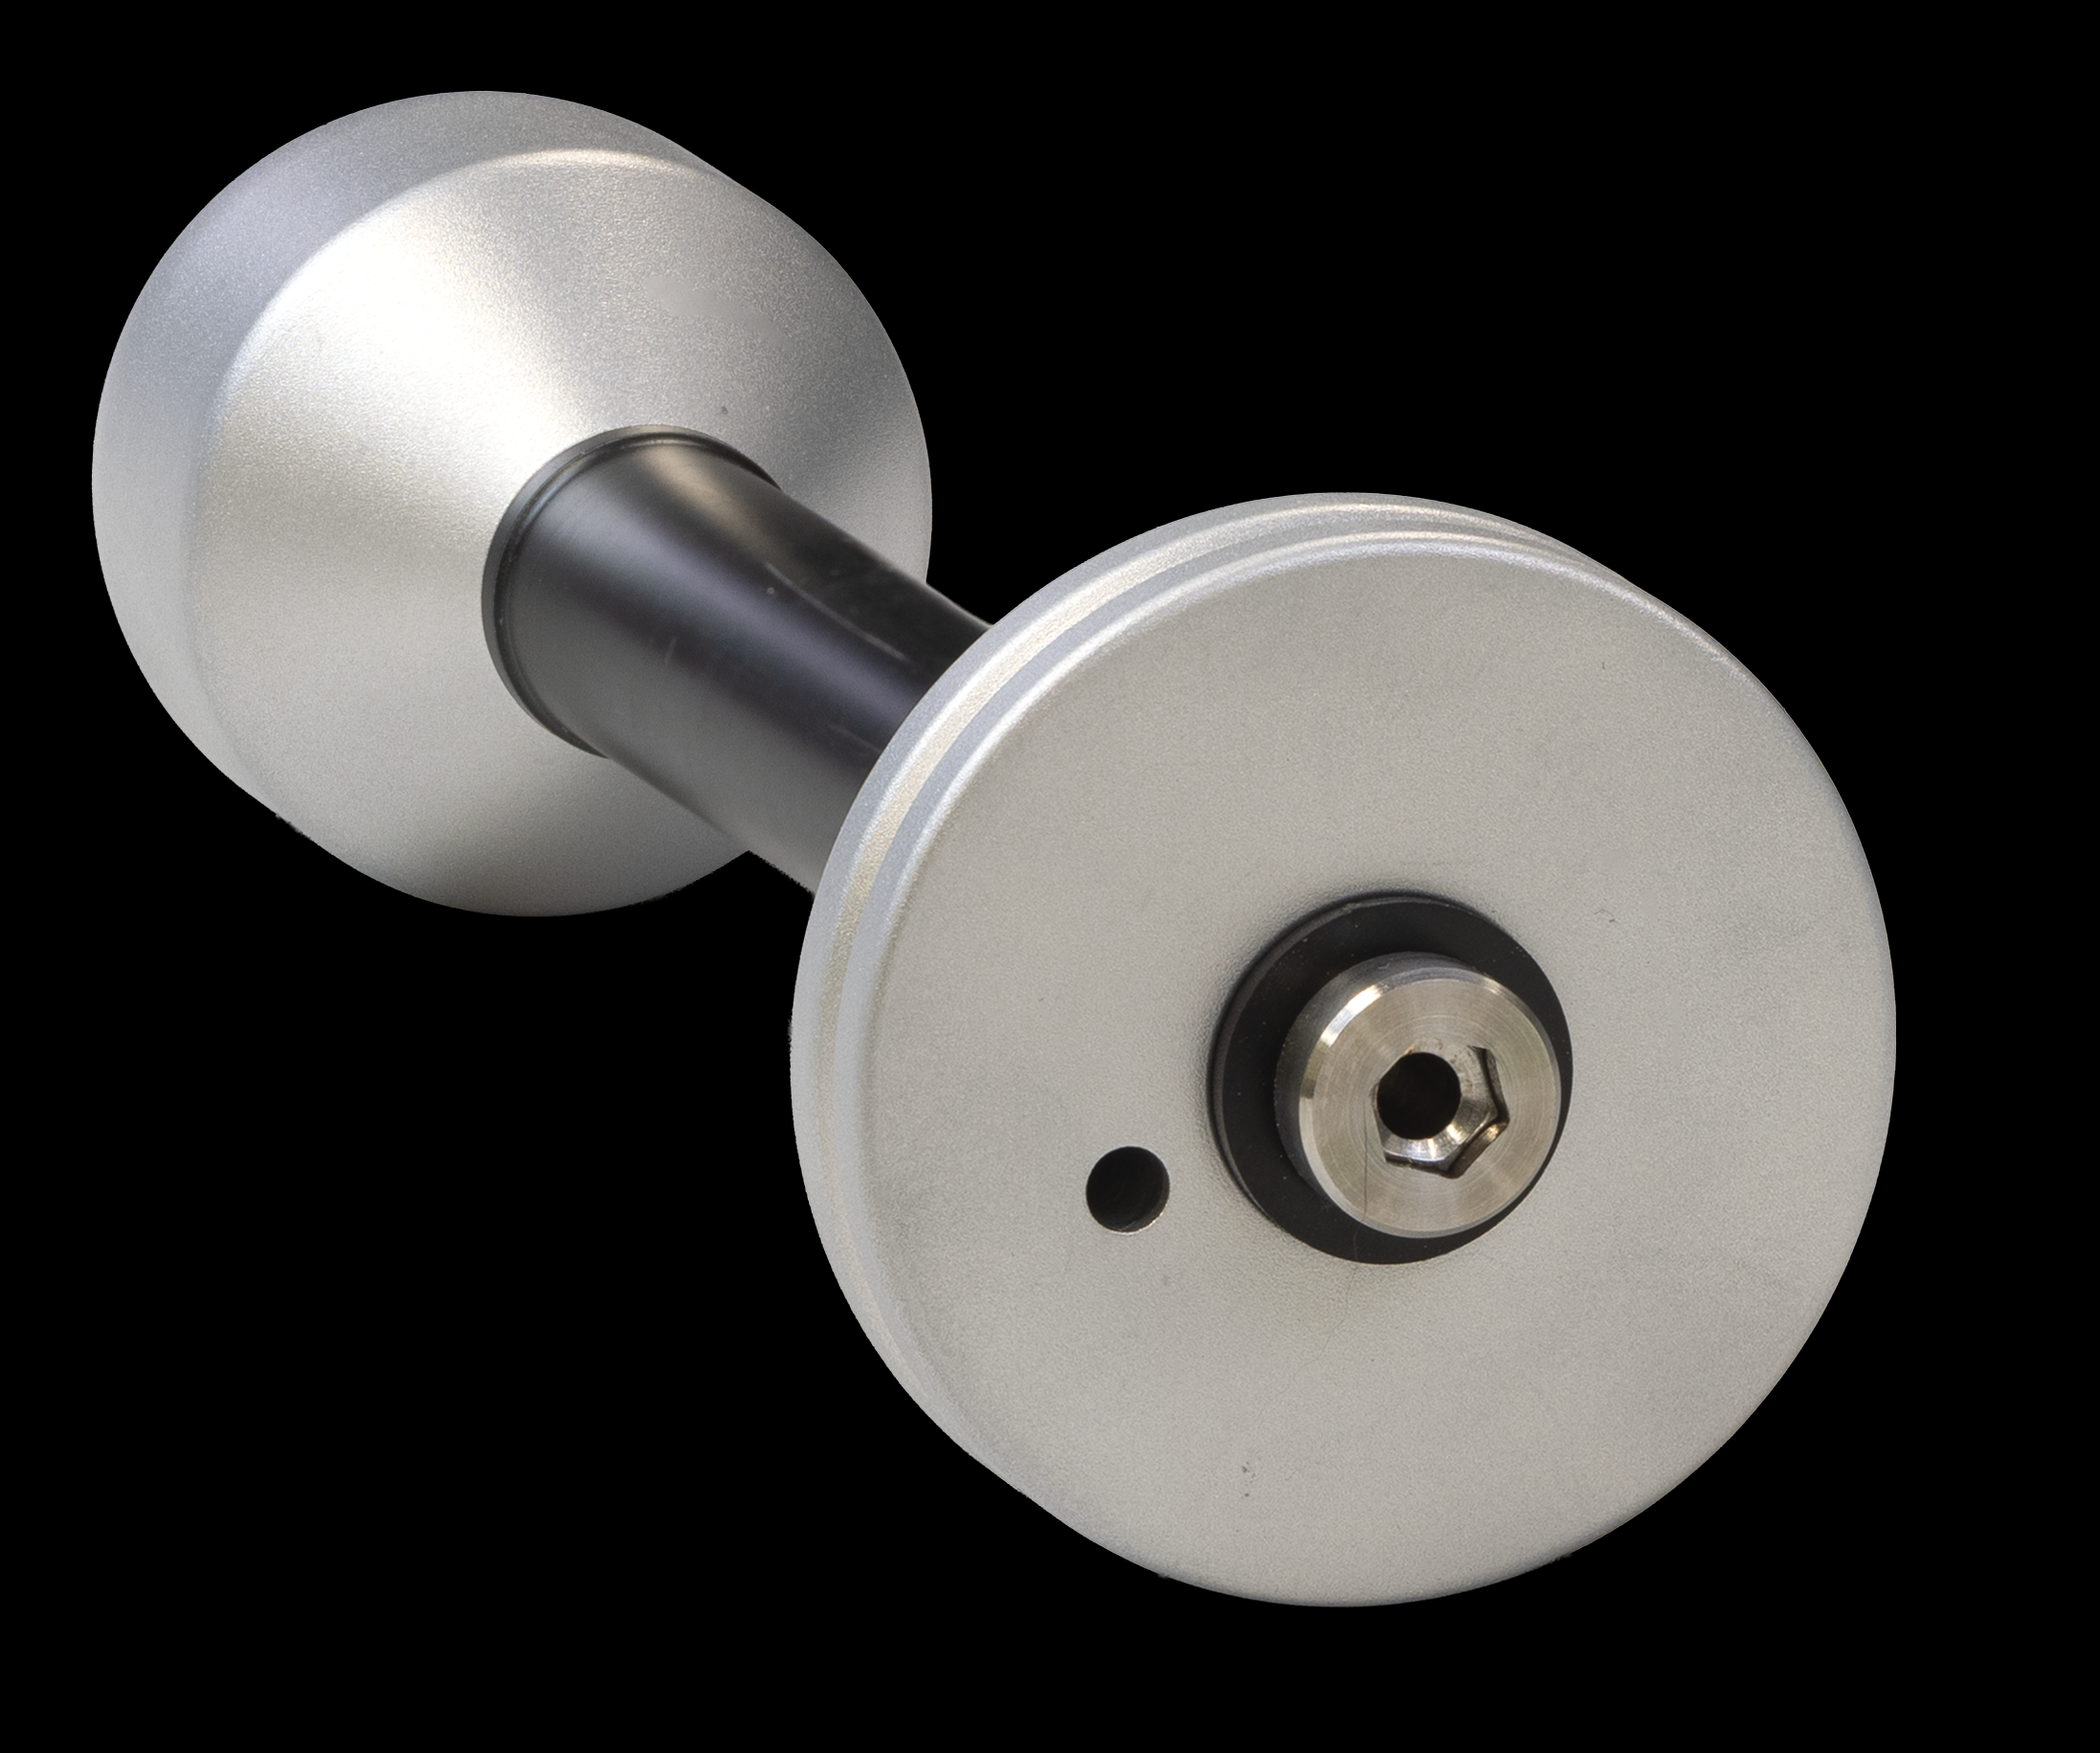
The Slider has two 4mm banana sockets in the base. Like all our bipolar electrodes, both sockets need to be connected at the same time. The socket on the outside of the base contacts the base of the Slider; the central socket (visible from below) contacts the head. Current flows through the Slider itself, between head and base. There's no second pad or electrode involved.
Cables
For normal use the Slider needs both base sockets connected. Standard E-Stim Systems cables have two 4mm banana plugs at the Slider end and a single jack at the powerbox end.
- 4mm Cable (standard). The everyday cable for the Slider.
- 4mm Low Profile Cable. The cable exit sits closer to the body of the Slider rather than projecting back. The natural pairing for sit-down play.
Powerbox compatibility
The Slider works with any of our E-Stim Systems powerboxes:
- 2B / Series 2B. Use one channel; the second channel is free for a separate electrode.
- ElectroHelix
- ElectroPebble
- ABox MK 2
- E-Stim Remote System
The full powerbox range sits at estim.store power boxes.
The Slider will also work with most third-party powerboxes. We offer adaptors and cables to fit a range of boxes. Browse all cables and all adaptors, or contact us if you're not sure what you need.
Settings to start with
Usual rules. Plenty of ElectroGel, on the Slider before insertion. Start at zero, build up slowly, find your range.
ElectroGel is our own water-based conductive gel, designed for use with our electrodes. It gives consistent conductivity across a session, but you can use any water-based lubricant, just avoid silicone and hybrid lubricants.
Before each use
A quick visual check before you start. Takes ten seconds and saves a lot.
- Look along the length of the neck. It should be smooth and unmarked. If you can see scoring, deep scratches, or a raised burr where the locking screw sits, the screw has been over-tightened. Stop and contact us.
- Look at the head of the Slider where it sits closest to the body. Check for cracks, deformation, or visible wear.
- Check the locking screw is intact and the hex socket is clean.
- Check the cable connection points (the 4mm sockets) are clean and dry.
If anything looks wrong, don't use the Slider until it's been inspected or repaired. The lifetime guarantee covers manufacturing defects and normal-use issues. We'd rather see it back in the workshop than in use with a fault.
Adjusting the neck
 The Slider's defining feature is its sliding neck. The neck moves along a tunnel in the base of the electrode and locks at any position from fully retracted to fully extended.
Set the neck length with the Slider in your hand, before insertion. That's the recommended approach. You can technically adjust while inserted, but it's a bit more fiddly.
To adjust:
- Loosen the locking screw on the side of the base using the supplied hex key. A quarter-turn anti-clockwise is enough. You're not trying to remove the screw, just relax the clamp.
- Slide the neck in or out to the position you want.
- Re-tighten the locking screw clockwise. A quarter-turn is enough. The locking screw has a nylon pad on the end that grips the neck without scoring it, but the pad isn't magic. Over-tightening can damage the neck. Firm contact is what locks it, not force.
- Test the neck won't move with hand pressure before use.
Adjusting during a session
You can adjust the neck mid-session with the hex key, but the cleaner approach is to set it before insertion. If you want to change the depth or feel during a session, it's usually faster to slide the whole electrode rather than fiddle with the lock.
Range of adjustment
The Slider ships with the 55mm Standard neck. That covers a useful range out of the box. The Long neck extends the maximum to 75mm. The Short neck reduces the maximum to 35mm and cuts down the length sticking out the bottom of the Slider, so you can sit comfortably with the Slider in place. If you're planning sit-down play, pair the Short neck with a 4mm Low Profile Cable. The cable exit stays close to the body rather than projecting behind you.
Extra necks are available on the Slider product page.
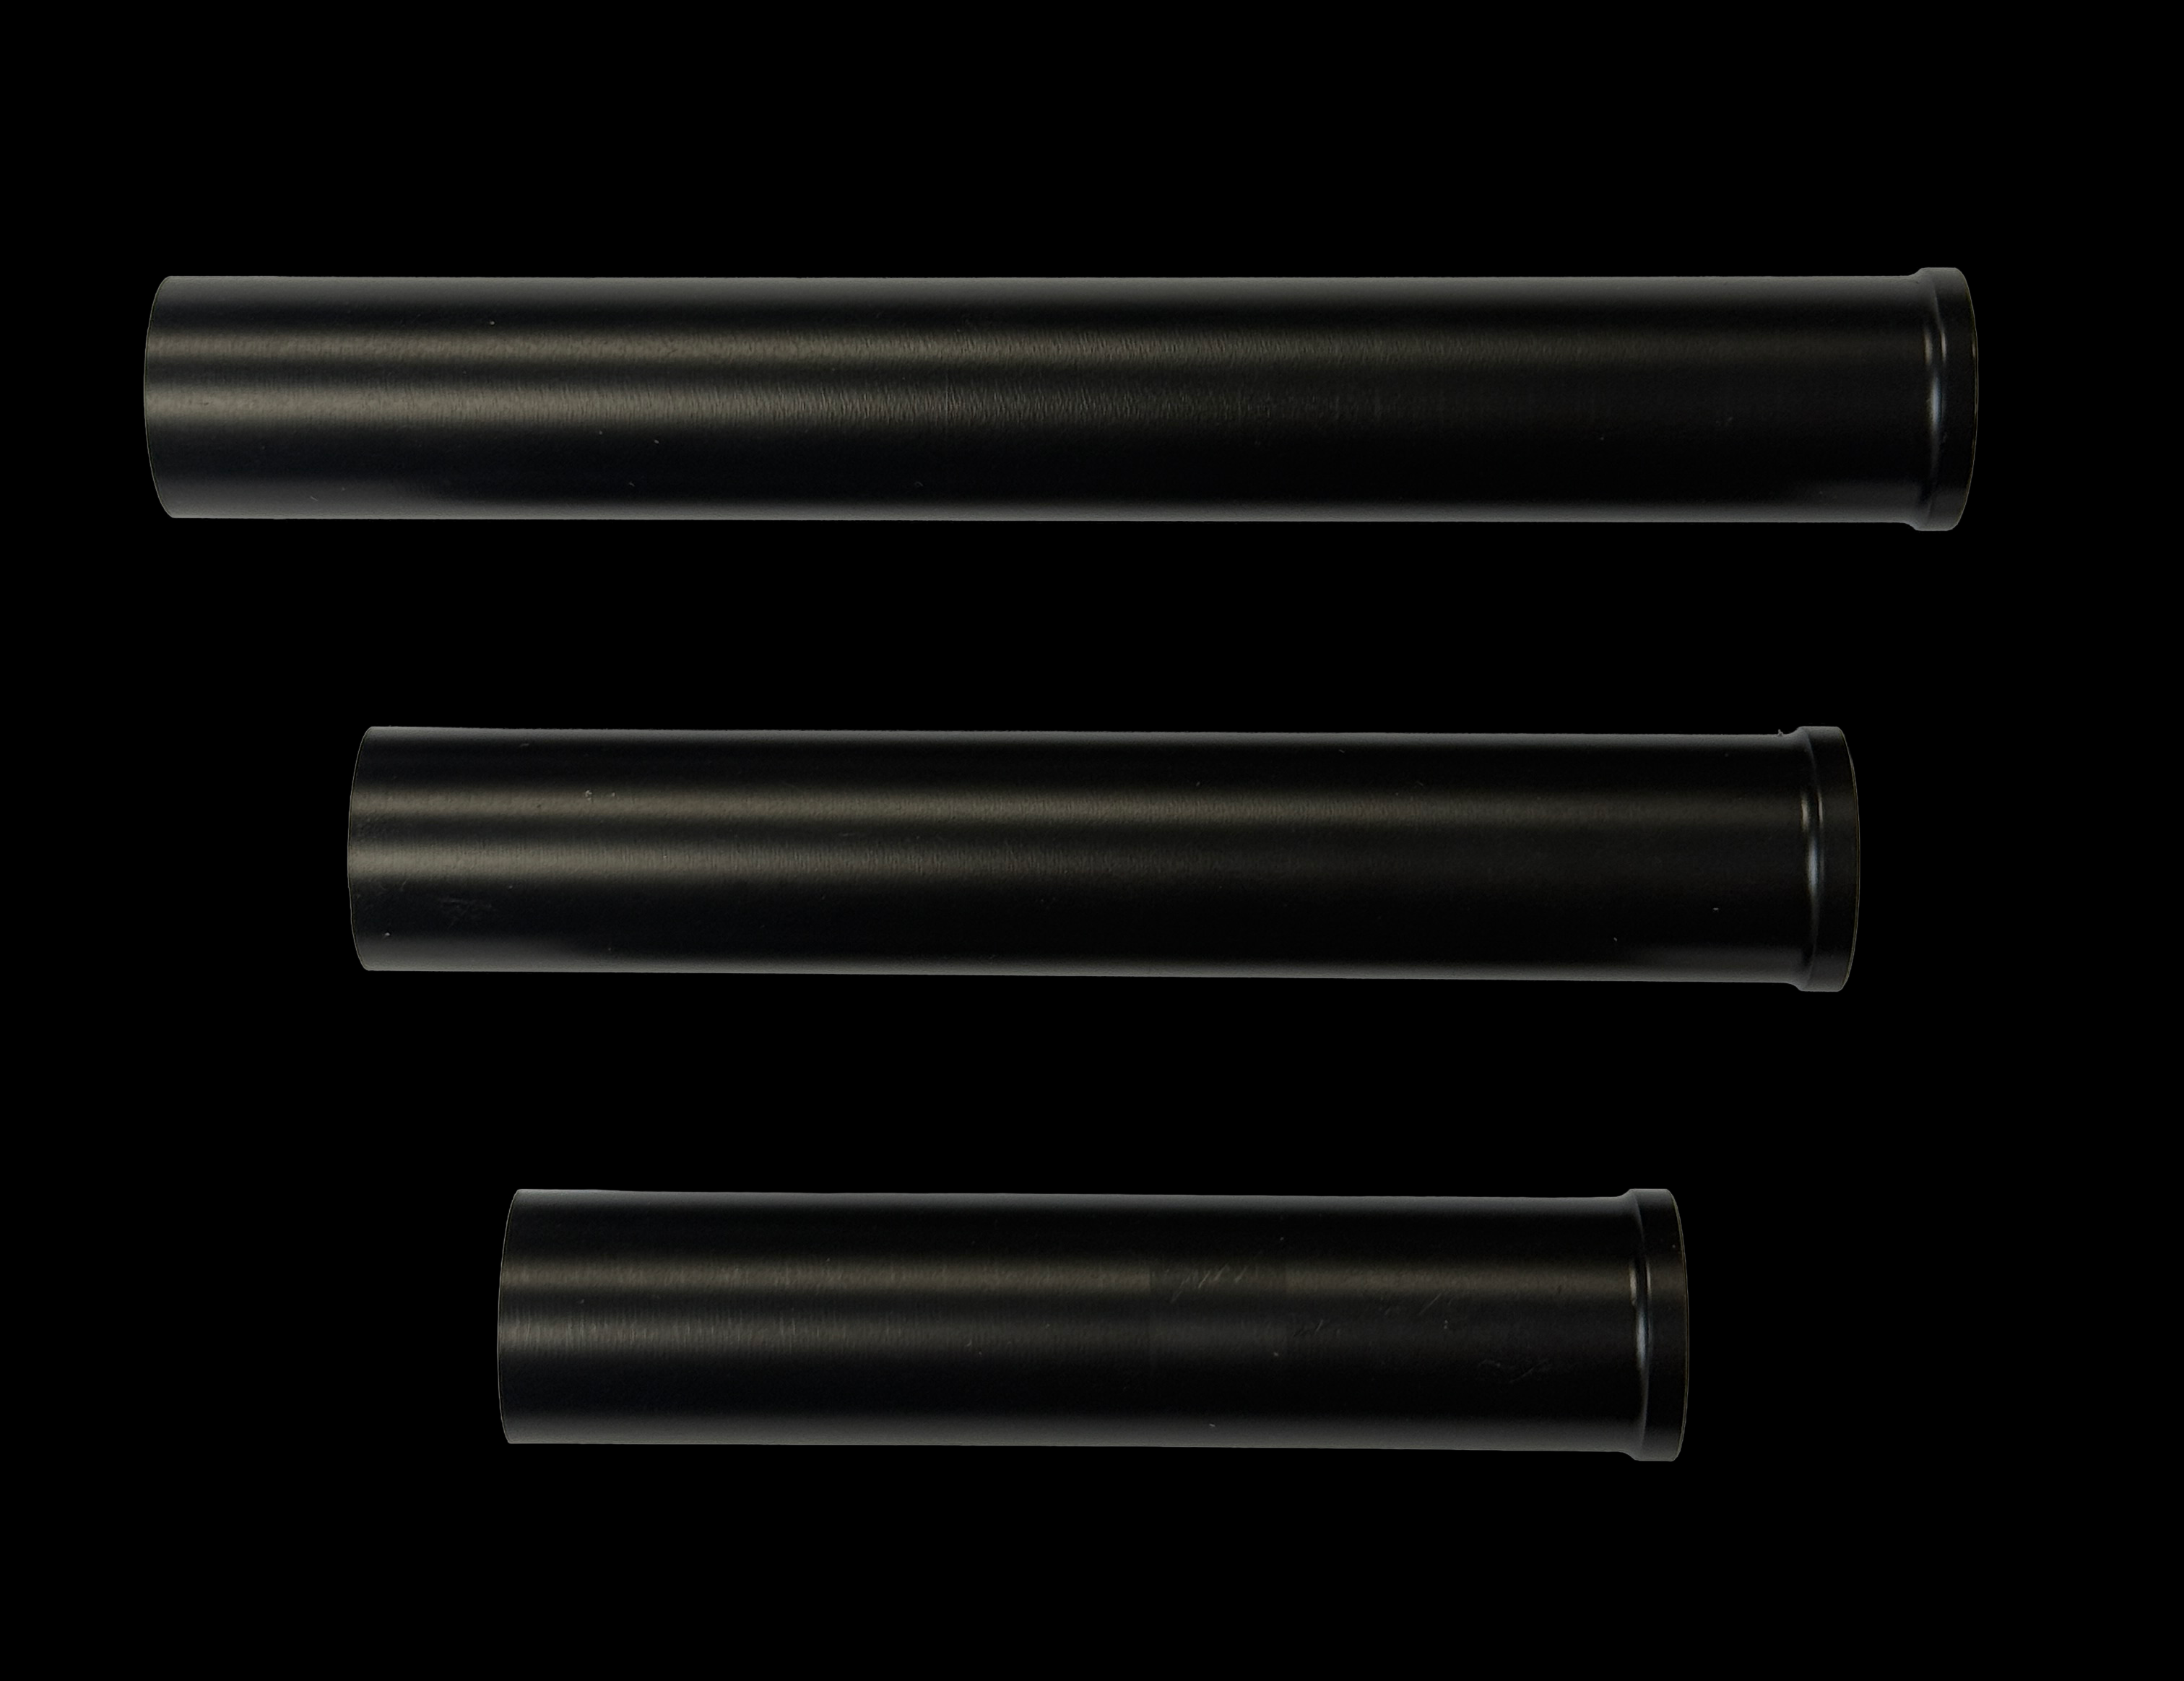
Neck dimensions
| Neck | Length | Total adjustment range |
|---|---|---|
| Long | 75mm | 3mm to 75mm of slide |
| Standard (fitted as standard) | 55mm | 3mm to 55mm of slide |
| Short | 35mm | 3mm to 35mm of slide |
All necks share the same 3mm minimum. You can lock the neck at any position along the track between minimum and maximum.
Changing necks
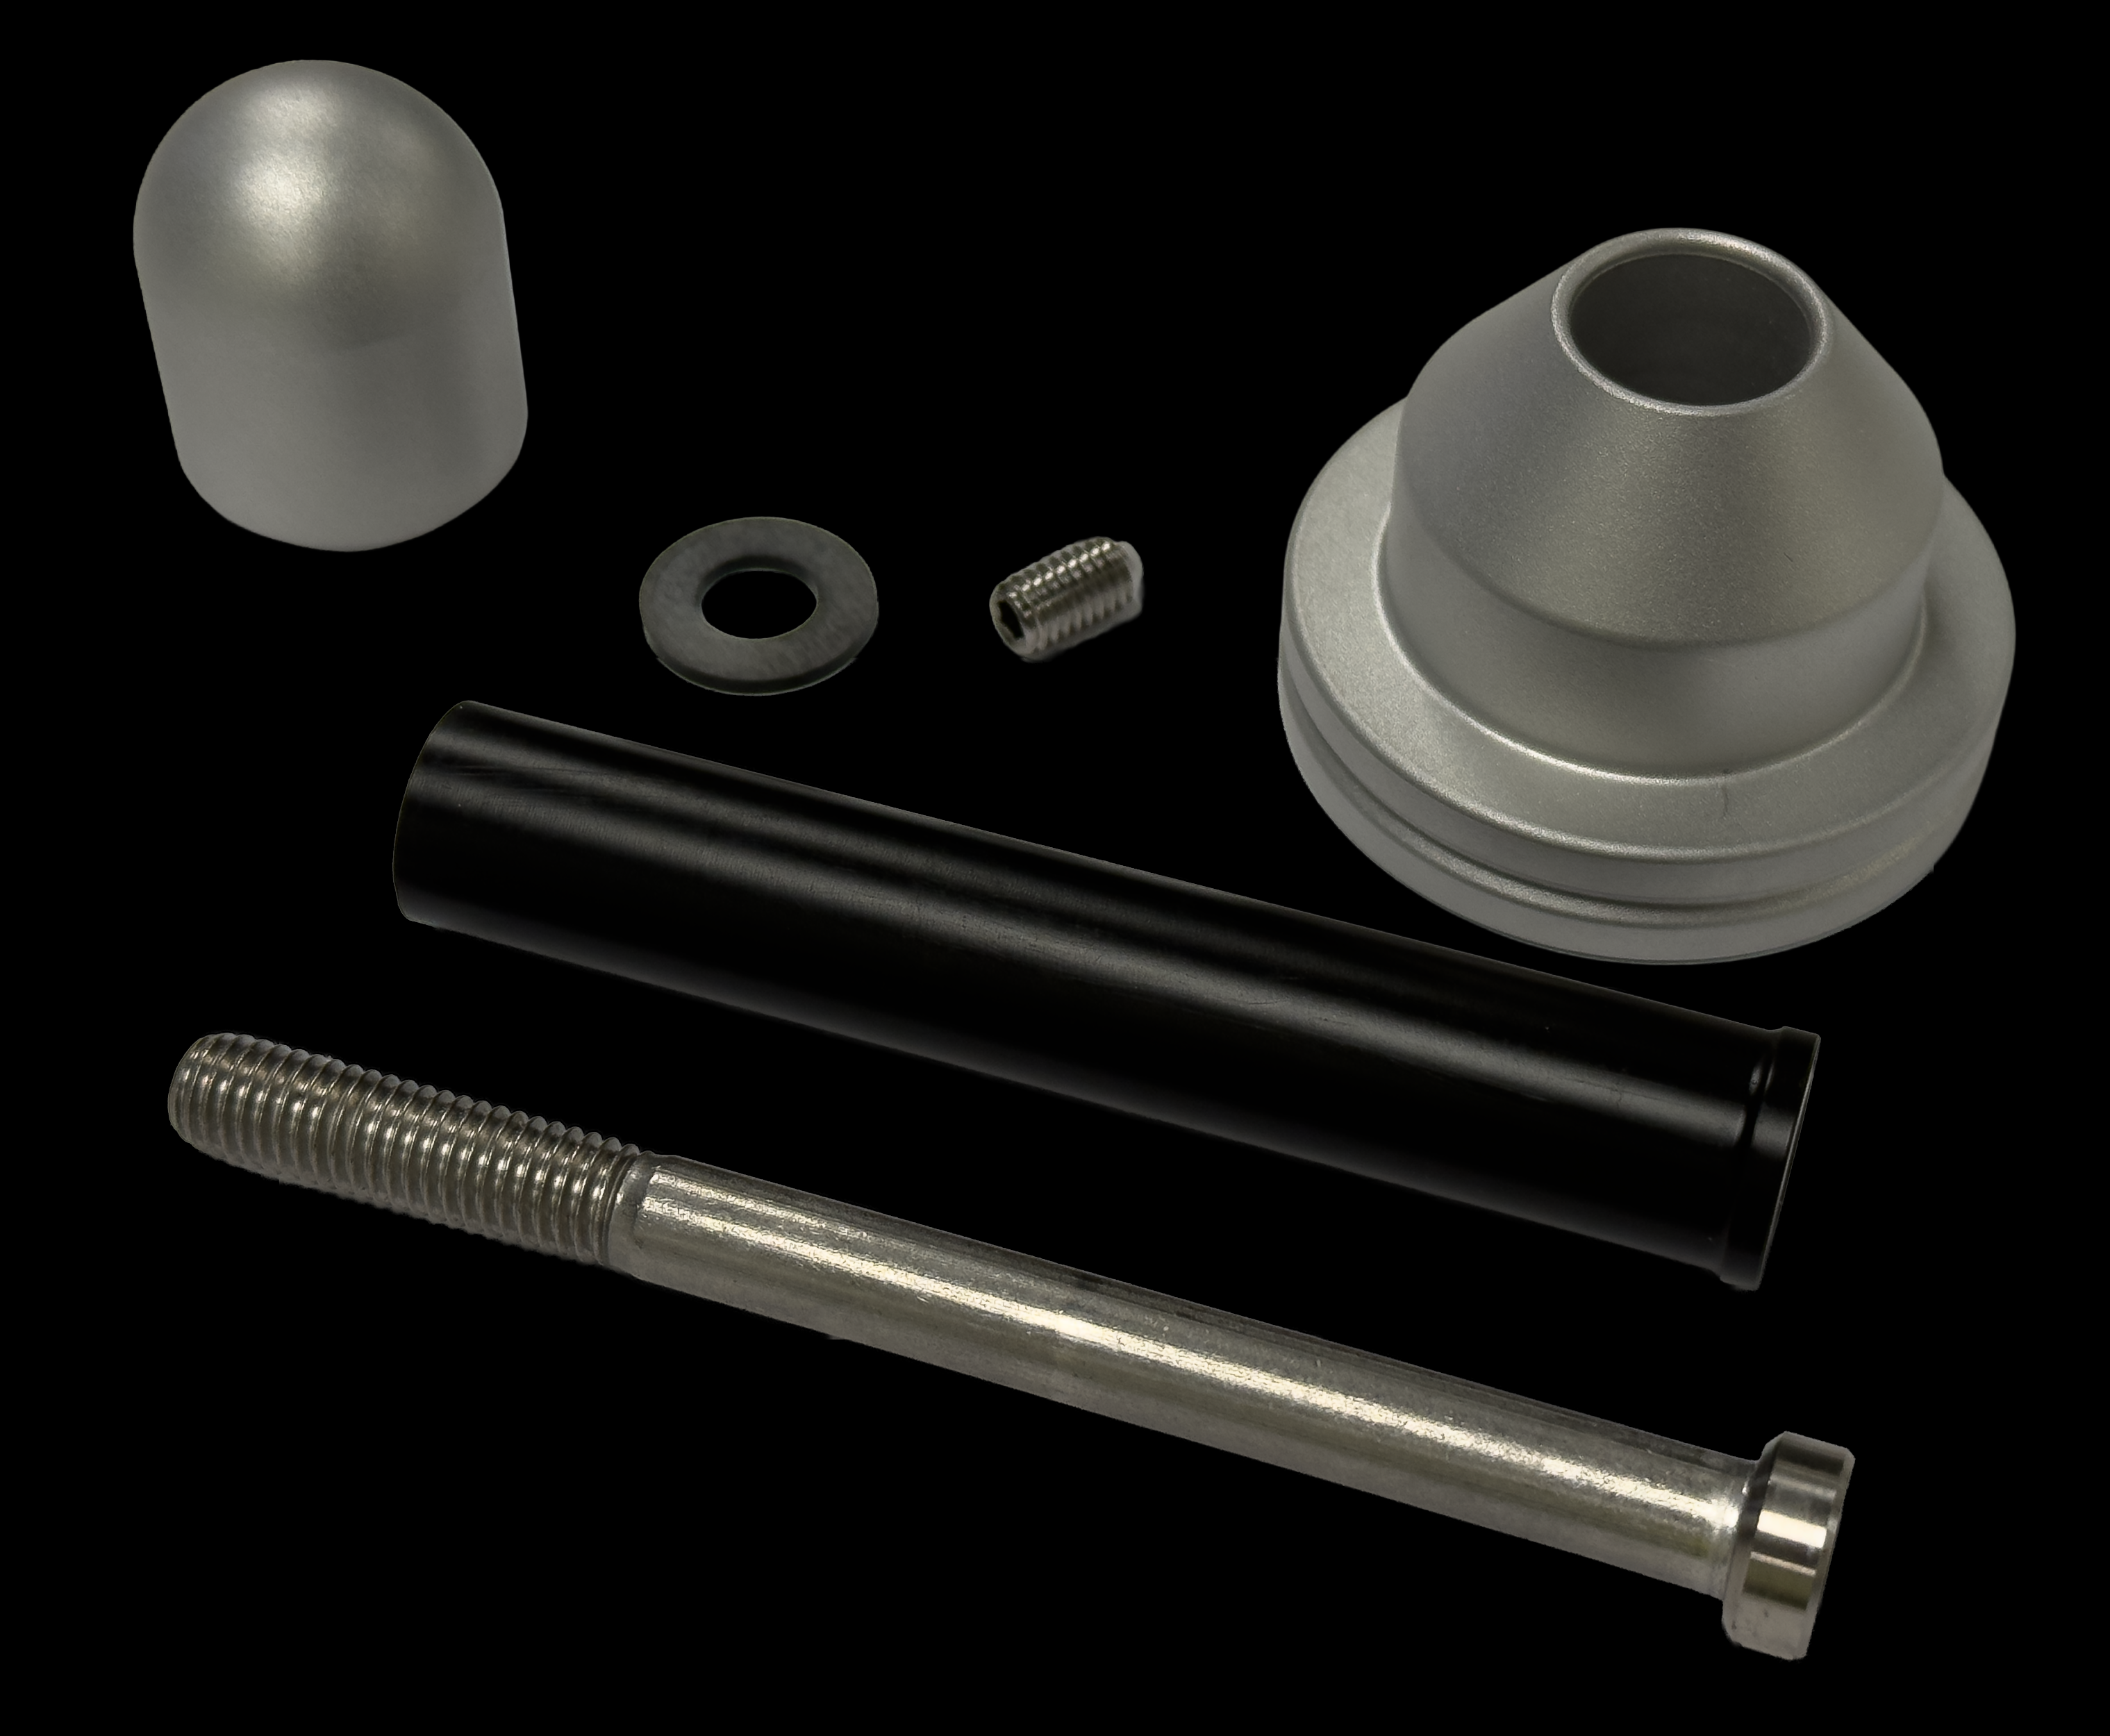
 Necks are interchangeable between Slider Small and Slider Large bodies. Each neck has its own central bolt, sized to that neck length. When you swap to a different neck, swap to that neck's bolt as well. Each spare neck ships with its bolt and a base washer.
You will need a 6mm hex key for the central bolt - this is the same one used across the whole E-Stim Systems insertable range. If you already have one that fits your other electrodes it will fit this one.
To swap:
- Remove any cables.
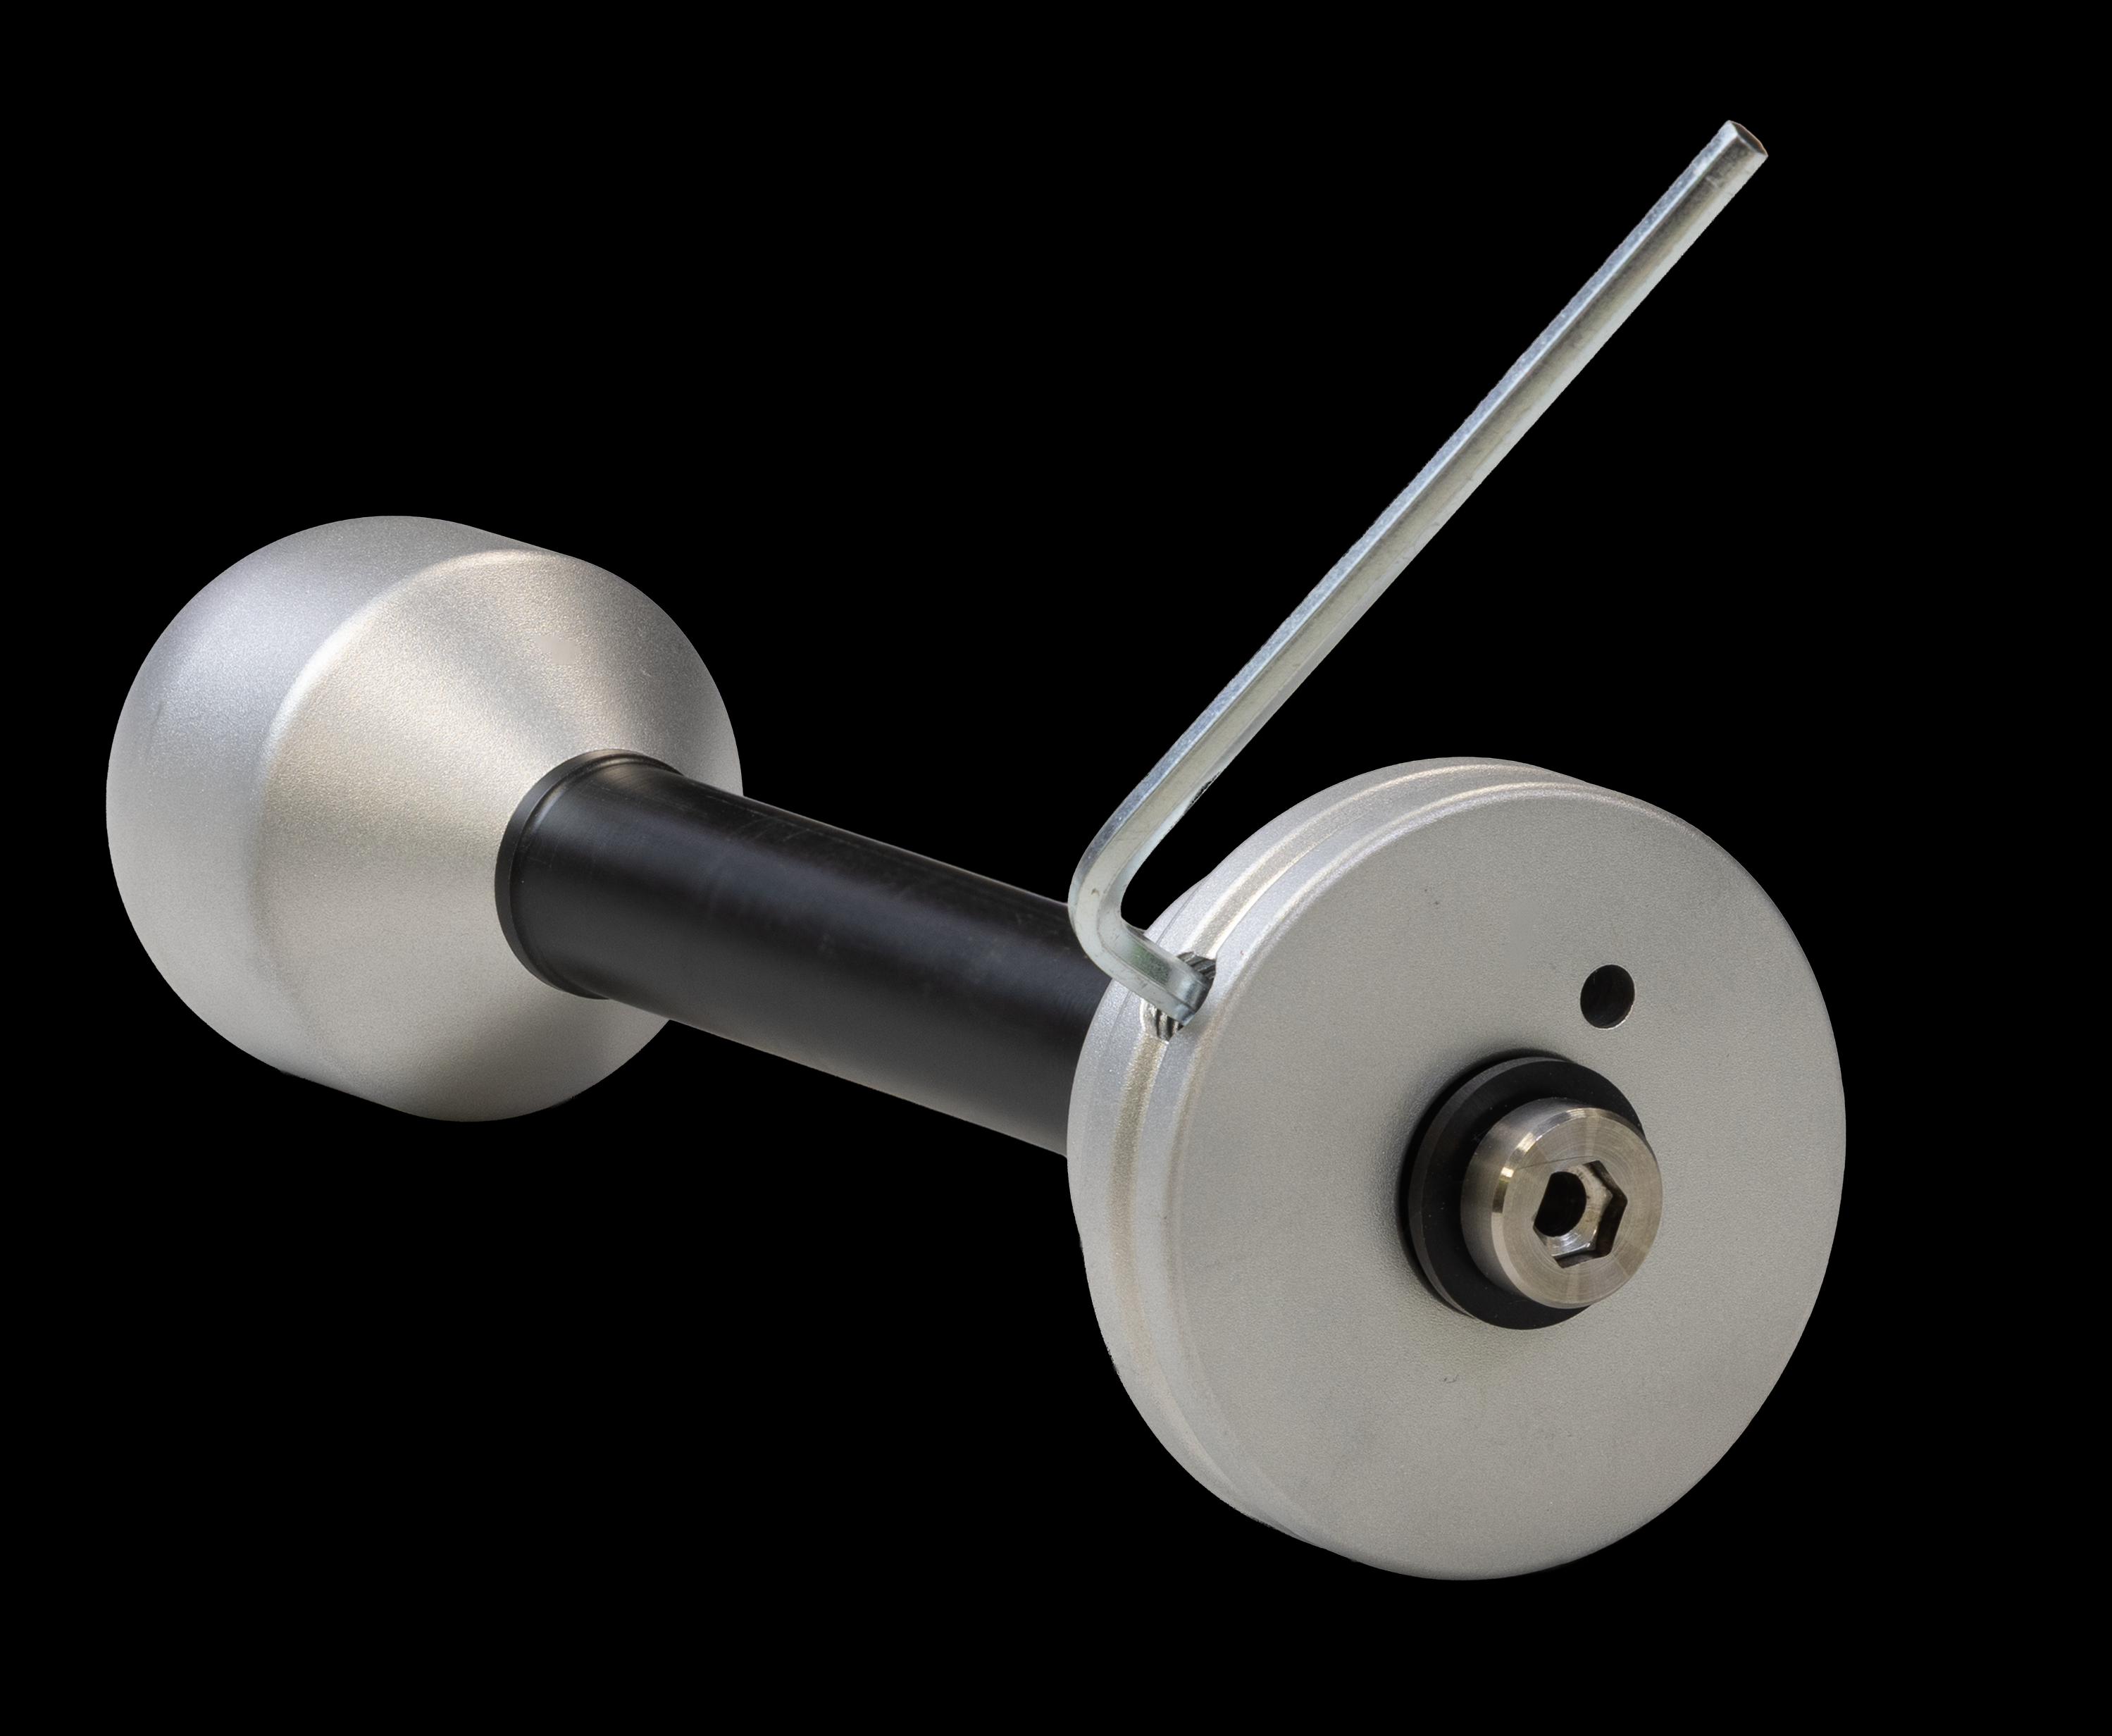
- Loosen the locking screw fully.
- Unscrew the central bolt with the larger hex key (not supplied). Hold the head to stop it rotating. Set the bolt and base washer aside with the neck you've just removed, they belong together.
- Withdraw the current neck assembly from the base.
- Slide the new neck into the base from the sloped end, ridge towards the head end.
- Insert the new neck's central bolt with its base washer in place.
- Screw the head back on.
- Re-tighten the locking screw to hold the neck. A quarter-turn once it's firm.
Disassembly for cleaning
 The Slider is fully disassemblable for cleaning.
Tools needed
- The 3mm hex key supplied with the electrode (for the locking screw)
- A larger 6mm hex key for the central bolt (not supplied, this is the same key used across the E-Stim Systems range)
- A clean, soft cloth or paper towel for catching small parts
To disassemble
- Remove any cables.
- Loosen the locking screw fully. It will come out of the base.
- Unscrew the central bolt with the larger hex key. Hold the head to stop it rotating. Withdraw the central bolt. Don't lose the base washer.
- Withdraw the neck from the base.
- The head, neck, base washer, body, and locking screw are now five separate components.
To reassemble
- Drop the base washer onto the central bolt.
- Slide the neck into the base from the sloped end, ridge towards the head end.
- Insert the central bolt (with the base washer fitted) up through the base.
- Screw the head back on.
- Drop the locking screw back into its threaded hole.
- Tighten with the hex key until the neck is secure. Don't over-tighten.
Cleaning
The Slider is machined from aircraft-grade aluminium alloy, stainless steel fittings, and food-grade plastics. It can be cleaned the same way you'd clean any quality insertable electrode.
We recommend cleaning after every session.
- Disassemble fully
- Wash all components in warm soapy water, or medical-grade cleaning solutions
- Rinse thoroughly under running water
- Dry with a clean cloth or leave to air-dry on a clean surface
- Reassemble before storage
Avoid bleach, abrasive cleaners, and silicone-based cleaning sprays.
What to avoid
- Don't put the Slider in a dishwasher. The heat and detergent can affect the surface finish over time.
- Boiling the Slider won't damage it, but it may discolour the metal surfaces. The Slider will still work fine, the surfaces just go a little darker.
- Always use ElectroGel, our own water-based conductive gel, designed for use with our electrodes
- Don't store the Slider damp. Dry it properly before putting it back in storage.
Storing
Store the Slider clean, dry, and reassembled. A drawer, a small bag, or a dedicated toy storage box all work.
S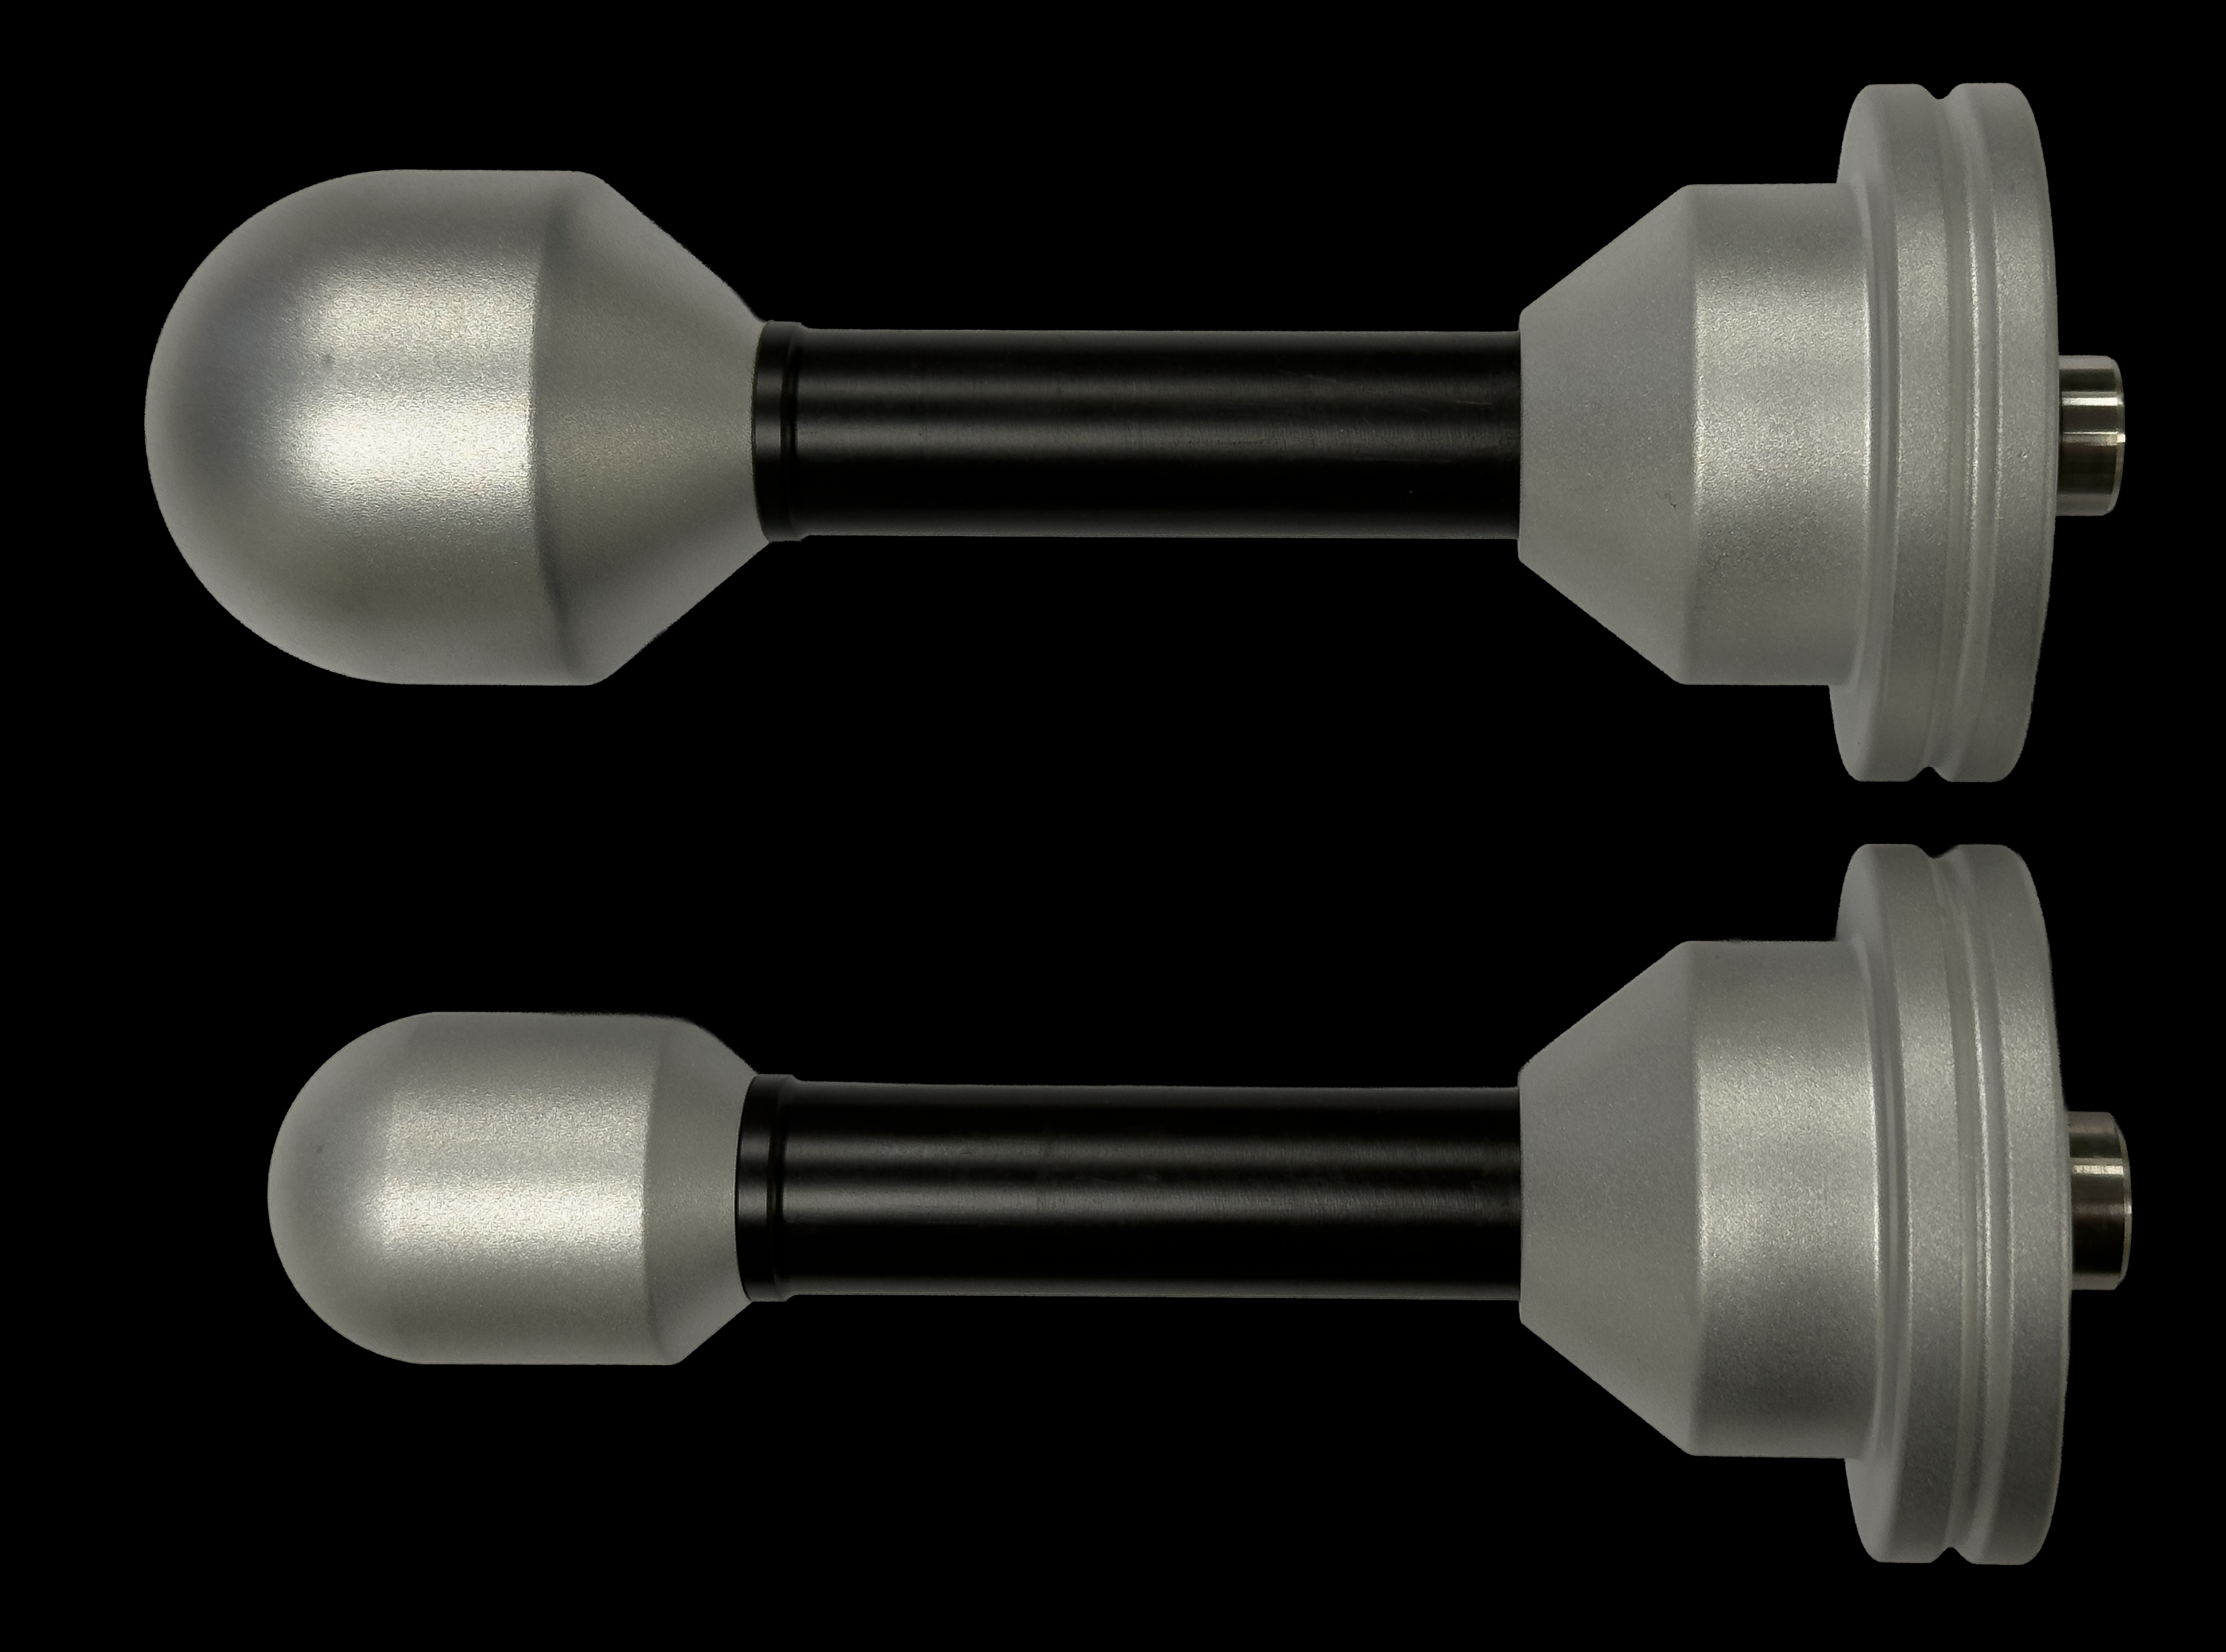 lider Small versus Slider Large
The two sizes share everything except the head. The base, flange, neck mechanism, locking system, and materials are identical. Slider Small has a 1" head; Slider Large has a 1.5" head. That's the only difference.
| Property | Slider Small | Slider Large |
|---|---|---|
| Origin | Evolved from the Flange | Evolved from the Moaner |
| Head diameter | 1" (25.4mm) | 1.5" (38.1mm) |
| Base flange diameter | 2" (50.8mm) | 2" (50.8mm) |
| Base length | 35mm | 35mm |
| Compatible necks | Long, Standard, Short | Long, Standard, Short |
| Spare neck pack contents | Neck + central bolt + base washer | Neck + central bolt + base washer |
| Connection | Two 4mm banana sockets | Two 4mm banana sockets |
| Material | Aircraft-grade aluminium, stainless steel, food-grade plastics | Aircraft-grade aluminium, stainless steel, food-grade plastics |
| Warranty | Lifetime | Lifetime |
If you're new to insertables, the Slider Small is the gentler starting point. If you've used insertables before and you know you want something more substantial, then the Slider Large is the natural choice. Both are equally well-engineered. The choice is about fit and preference, not quality.
Safety notes
The Slider is an insertable electrode. The same e-stim safety rules apply as with any insertable:
- No e-stim above the waist (no electrodes on the chest, neck, or head). Current paths near the heart are off-limits.
- Start at zero intensity and build up slowly
- Stop immediately if anything feels wrong. Pain, burning, sharp tingles in places they shouldn't be.
- Use ElectroGel for conductivity
- Do not share the Slider between people without thorough cleaning between users
- Do not use during pregnancy without consulting a clinician first
- Do not use if you have a pacemaker, an implantable defibrillator, or other implanted electrical devices
- Do not use on broken or irritated skin
For the full safety guidance, see the Safety page on estim.store.
Troubleshooting
The neck is stiff to slide
Make sure you have loosened the locking screw enough. Sometimes a small amount of ElectroGel on the neck shaft restores smooth movement. If the neck has dried out fully (after thorough cleaning, for instance), this is the expected feel. Wet it lightly before adjusting.
I can't feel anything
- Check both 4mm banana plugs are fully seated in the Slider's base sockets. Both must be connected for the bipolar circuit to complete.
- Check the 3.5mm jack is fully seated in the powerbox
- Check the powerbox is on and the channel selected
- Check the intensity is above zero
- Add more ElectroGel. Dry contact reduces conductivity sharply.
It feels too sharp
Reduce the intensity. The Slider's bipolar design concentrates the current locally, which can feel more focused than pad-based setups. If sharpness persists at low intensity, check there's enough ElectroGel. Dry contact also creates sharp sensation.
The Slider has a small ding or scratch
Cosmetic marks don't affect function. Aircraft-grade aluminium won't shed. If the mark is on the slide neck and the neck has gone stiff, contact us.
I've lost the hex key
The Slider uses a standard metric hex key (size: 3mm). You can pick one up from any hardware shop or online. If you want a like-for-like replacement, contact us and we'll let you know what we can do.
The Lifetime Guarantee
The Slider is covered for the lifetime of the original owner. If a manufacturing defect appears at any point, we'll repair or replace the affected component in our Watford workshop.
The guarantee does not cover:
- The hex key (standard metric hex key, available from any hardware shop)
- The cable. Cables are wear items, covered separately for 3 months. Replacements: 4mm Cable or 4mm Low Profile Cable.
- Damage from misuse (dishwasher, drops, scoring caused by overtightening the locking screw, parts that have been mislaid.)
To raise a guarantee claim, contact us via the estim.store contact page. Keep your proof of purchase. We don't require website registration to honour the guarantee, but we do need to confirm the unit came from us.
Full guarantee terms: Lifetime Guarantee.
Where to go next
- Buy the Slider: Slider product page
- Other E-Stim Systems products: estim.store
- All powerboxes: estim.store power boxes
- All cables: estim.store cables
- Help articles: estim.store help hub
- Community forum: e-stim.net
- Contact us: estim.store contact page
