Getting Started
WARNING THIS IS A BETA RELEASE MANUAL NOT FOR 2.106 FIRMWARE
Previous Category :: E-Stim Basics Next Category :: Program Modes
E-Stim is a complex subject, and even after years of play you will possibly find new ways to add to your electroplay skills. But saying that, here is a simple guide on how to get started on your journey.
WARNING THIS IS A BETA RELEASE MANUAL NOT FOR 2.106 FIRMWARE
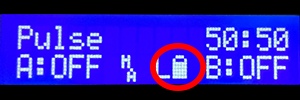
The battery level indicator shows the current level of the battery. There are 4 battery level symbols, indicating Battery FULL, 2/3 full, 1/3 full, and Battery empty. If you have plugged in the optional mains power supply then the battery symbol will not display. As the 2B uses a standard alkaline 9V PP3 battery, a brand new battery should show full*, however the unit will continue to operate with ‘flat’ batteries with a reduced output. This is designed to allow you to make the most out of a battery.
If your 2B starts to reset itself when higher power levels are selected, then this is generally a sign the battery might need replacing.
The battery level display will update whenever a control is adjusted. Due to processor constraints the battery symbol does not display in the Audio Modes.
*Because of the variations in battery manufacturing technology, a brand new battery may not necessarily display a full battery symbol.
Click this link for details on how to change the battery
When the E-Stim Systems mains power supply is plugged in, No battery symbol is displayed.
WARNING THIS IS A BETA RELEASE MANUAL NOT FOR 2.106 FIRMWARE
It is possible to use an external power supply with the 2B, but because of the isolation and safety issues when connecting to the mains we strongly recommend you only use an E-Stim Systems supplied universal power supply. The plug socket is beside the on off switch.
Always ensure that when you connect the external power unit, the 2B is switched off.
Insert the plug into the socket, switch the mains power on, then switch the 2B on. The display should light up as if batteries were fitted.
Use of the power supply will offer around a 30% Power increase.
When the power supply is connected, the Display will no longer show a battery symbol, as the 2B is no longer running off Battery.
WARNING THIS IS A BETA RELEASE MANUAL NOT FOR 2.106 FIRMWARE
The 2B is powered by a single 9V PP3 alkaline battery. Although it is technically possible to use rechargeable batteries with the 2B we do not recommend them as they almost always have issues with power delivery. If you are seeking more power, then we strongly suggest you consider using the optional mains power supply.
We do NOT recommend the use of Zinc Carbon batteries with your 2B control unit.
- Ensure the unit is switched off, and any electrodes are disconnected.
- Turn the unit over and using a small screwdriver or a fingernail inserted into the battery compartment slot, gently prise the battery compartment cover out.
<Pictures to follow>
Remove the old battery (if fitted) and replace with a fresh Alkaline PP3. The battery connector is polarized so it should not be possible to connect the battery incorrectly, but ensure the polarity is correct before attempting connection.
- Place the battery into the unit and replace the battery compartment cover. The cover is fitted with two tabs which insert into the lower half of the case first, and then the top half of the cover will clip into position.
- Turn the unit over. The unit is now ready for operation.
- Please note we do NOT recommend the use of zinc carbon or rechargeable batteries due to their general poor performance with the later firmware versions..
In the event the 2B unit is not being used for a period of time, remove the battery to avoid any potential damage from battery leakage.
WARNING THIS IS A BETA RELEASE MANUAL NOT FOR 2.106 FIRMWARE
Outputs
Connection to any electrode is via two heavy duty 3.5mm mono jack sockets. Ensure the 2B is switched off before inserting or removing the connector to eliminate the possibility of either inadvertent electric shocks or short circuits occurring. When removing the connectors. Grip the insulated shaft of the connector, not the wire and gently pull.
Connections to your E-Stim 2B use industry standard 3.5mm mono jack plugs, compatible with a number of other manufacturers control units and electrodes.
<picture>
Inputs
<picture>
Connection to audio devices and the digital link system is via the centre 3.5mm stereo jack socket. Ensure the 2B is switched off before inserting or removing the connector to eliminate the possibility of short circuits occurring. When removing the connectors. Grip the shaft of the connector, not the wire and gently pull.
Ensure that audio devices or the digital link are only connected to the centre jack socket. Connecting to either of the output jack sockets will destroy your audio unit. The audio input is designed to operate with low level headphone style outputs. It is not possible to operate the Digital Link at the same time as the Audio Input. The Digital link cable despite appearances is NOT a standard USB cable. DO NOT attempt to attach any other USB cable to the 2B digital link input, you will destroy your 2B and invalidate your guarantee.
DO NOT attempt to connect an output to an input. It will destroy your 2B unit, and possibly the item you connect to.
WARNING THIS IS A BETA RELEASE MANUAL NOT FOR 2.106 FIRMWARE
Its not all about Power
Power seems to be a major target for many people when purchasing an e-stim unit, but without the understanding of how power relates to play it is difficult to ensure you get the most out of any unit. Units that quote a straight power output such as 80mA are generally TENS based units that give no indication how the generated waveform actually provides the sensation of power delivery. Like a racing car, power is not just down to horse power but is related to how it is delivered.
The 2B is considered to be a powerful unit, but if you want even more power, then consider the optional power supply, which will give you around 30% more than battery alone.
Modes for Variety
The 2B has number program modes designed for pleasure and stronger sensations. Don't be surprised if the modes don't give you want you straight away. Nothing ever everything works for everyone, at least on the default settings, so experiment. Because of the way we have designed the wave forms, not every mode will provide you with sensation at the same point, nor will every mode give you the sensation that someone else feels, even with the same settings. E-Stim is a complex subject almost like an art form for many, and it can take practice to find our what you enjoy. Enjoy the journey.
Waveforms created for Sensation
E-Stim interacts with the nervous system of the body in order to provide a sensation. This means that the nature of the waveform is crucial, providing maximum sensation to the nerves, but with a reduced amount of energy that can cause heating and damage to underlying tissues. All E-Stim Systems devices utilise AC based wave forms so there is no issues with DC causing tissue damage, and the waveforms are developed to maximise the sensation as effectively as possible.
Feel
All of our modes have some control over feel. Feel adjusts portions of the waveform to give to a difference in feel, from soft and spiky at one end, to harsh and hard at the other. The choice is down to you.
Power Control
Power delivery depends on the unit itself, the power source (using a 2B with a power supply with give an increased sensation of power), the Levels set, the settings of the adjustments, the current mode, Box level, output map, electrodes used and electrode positioning. All of these elements combine to give you a wide range of sensation from a tickle up to and beyond a hard throbbing pulse.
Power Levels
The 2B operates in 3 main power settings, with each level having a 0-100% setting. Low Power, is the default, High Power exists for more experienced players and Dynamic Power gives the benefit of both, but with a lessened control range, with the power output determined by the Channel Settings. For more details on the Power Systems follow the Power Systems Link
Output Maps
As well as the Power Level (Low, High and Dynamic), the 2B has a series of Output Maps. These user selectable maps give even more variety to the output of a 2B. more details on the output map system can be found in the Output Maps section.
WARNING THIS IS A BETA RELEASE MANUAL NOT FOR 2.106 FIRMWARE
Step 1
Read this manual and familiarise yourself with the controls.
Step 2
Step 3
Turn the 2B on. (The power slide switch can be found on the bottom of the control unit). The display should light up and the 2B will go through its self test. You should now see a screen like this

Now turn the 2B off. If for some reason you see a different display, then you can perform a Factory Reset to get everything back to the default state.
Step 4
Choose electrodes. The 2B is supplied with a simple set of Sticky pad electrodes and 2mm cables to get you started, but we do offer an ever increasing range of E-Stim Electrodes and accessories. See estim.store for more details.
Step 5
Connect things up. Always ensure the 2B is switched off when connecting or disconnecting electrodes.
Step 6 and 7 and 8 .......
Turn the 2B back on
Now you can start experimenting with the modes
WARNING THIS IS A BETA RELEASE MANUAL NOT FOR 2.106 FIRMWARE
The 2B unit has five user controls. Each control allows the user to adjust a particular aspect of the output. It is the operation of the controls in combination that will allow the user to provide an effective electro-stimulation session.
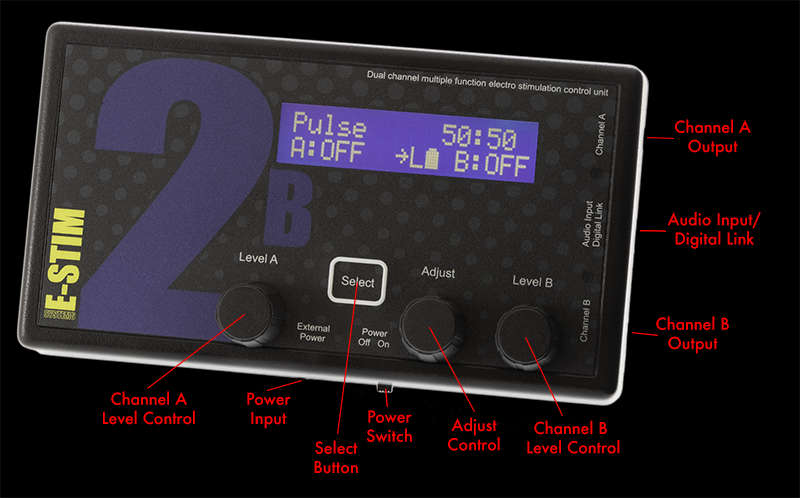
The controls are (from left to right)
Channel A Level Control
The Select Button
The Adjust Control
Channel B Level Control
There is also a power slide switch (on the bottom side of the unit) and an LCD contrast control (accessed from the rear of the unit.)
Channel Level Controls
The channel level controls adjust the absolute level of the output of the relevant channel. Each Channel control value is displayed on the LCD screen, with values from OFF (0) to MAX (100%). OFF is zero output, MAX is full output. The output levels automatically drop to OFF when selecting a mode, and will always start off at OFF (0%) when selecting a new mode.
Select Button
The select button is used in conjunction with the Adjust control, to change and adjust the settings in all the various modes, including changing and selecting the modes themselves. The Select Button responds to a light press, there is no need to press too hard. Pressing and holding the Select Button while rotating the Adjust Control allows further adjustments of the Feel in many modes.
Adjust Control
The adjust control is used in conjunction with the select button, to change and adjust the settings in all the various modes, including changing the modes themselves.
Depending on the mode, the 'C' and 'D' values can be adjusted using the Adjustment Control. Turning the Adjustment Control either clockwise or anticlockwise will change the 'C' adjustment value up or down, while pressing and holding the select button and turning the Adjustment Control which change the value of the 'D' setting. Not all modes use both the C and D values.
Displays
The 2B has 3 display elements, the bright backlight LCD display, giving the user details of all of the functions of the 2B, from control settings to helpful messages.
The two blue LEDs on the right hand side of the unit illuminate in proportion to the intensity of the relevant output. The LEDs might appear to glow slightly when the unit is turned on and there is no output - this is due to the internal reflection of the backlight and is not a fault.
The LCD display depends on the mode but the basics are:-
Top Line
showing the Mode, (the current program mode) and Adjust Values (Dependant on the Mode, the first value is altered by the Adjust Control Knob and the second value by Select + Adjust Control Knob)
Bottom Line
Showing the Level of Channel A, Join Control Status , Current Output Map, Power Mode, Battery Level (if not using Mains Adaptor) and the current Level of Channel B
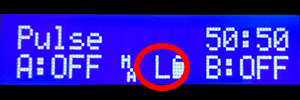
Power Level Display
The Power Level Display shows the current power level the 2B is set to. Options are L - Low, H for High and D for Dynamic. For more details on the power level selection system see Power Selection
Battery Level
The Battery Level Display shows the current battery level. The more the battery is empty the lower the charge. If the 2B is connected to the mains then the battery will not be displayed
Adjusting Contrast
To change the contrast of the LCD, turn the unit over, and with a small insulated cross head screwdriver insert into the hole in the rear of the unit and gently adjust the cross head adjustment inside. Adjustments should not be necessary as the contrast is set during testing in the workshops.
<picture to follow>
